|
|
Tips
for Using and Caring for Your Tools
-
Take
care of your tools so you can buy new tools with your money instead of
replacing tools that you already had. Every time you go into your shop
make it a habit to pick a few of your seldom-used tools to maintain.
Dust and oil them or do whatever other maintenance is necessary.
If
you do just a few every time you go in, you will never be faced with a job of
maintaining them all at the same time and it will not even seem like a chore.
Maintain tools that you use frequently as soon as you are finished using
them.
-
Wax your "table" tools such as your
table saw,
scroll
saw and drill press frequently using car wax — especially if the
table is prone to rusting and you
live in a humid climate. The wax will help
the work slide more easily so it is worth the effort even if rust is not an issue.
-
The work we do is very similar to surgical work (although
there shouldn't be much blood involved, right?).
It stands to reason that the medical industry has some very cool items we can
use. The hardest part is finding a place to purchase these tools.
Companies like
Micro-Mark and a few others have gathered items from various
industries and made them available to modelers.
Talk to people who's work your respect if you
have doubts or questions about certain tools. For example, if you want
to get information about
airbrushes, then ask another modeler who does good
airbrush work. Avoid "experts" who's work does not back up their words.
Look for ways that will allow you to work with both
hands free. If you are holding the work in one hand and the tool in
the other, it can be difficult to have good control over what you are
doing. For example, to sand the leading edge of a wing, place the
wing on your
workbench so that it stands on the trailing edge.
Use
heavy tool boxes or bricks to hold the wing in place using some type of
padding (scraps of foam rubber, etc.) between the toolbox and the wing.
Now you can use both hands to guide a long t-bar
sanding block with less
chance of slipping and damaging the wing. It is not difficult to come
up with similar methods for other tasks.
Go to your local sewing shop and get a can of
sewing machine oil. Use it to lightly coat tools that can rust, lube
O-rings in airbrushes, and lubricate joints in scissors and pliers.
-
I think it is safe to say that we've all bought a
useless gadget tool or two. Hopefully experience will help us recognize
these items as such so we can stay away from them in the future (I am surprised
no one has invented the electronic covering trimmer). Usually the gadget is supposed to stand in for a skill the builder hasn't
developed. There is no substitute for developing your building skills
through learning and doing.
-
If a tool is inexpensive
and it is chromed then it is probably cheap and should be avoided.
Manufacturers chrome cheap tools to disguise poor quality. That does not
mean all chromed tools are poor quality.
-
Buy a good
straight
edge. I have two stainless steel "yardsticks" that are excellent.
They are approximately 3/32" thick, do not knick and will last my lifetime and
then some. They are not rulers as they do not have markings, but they are
excellent for cutting sheeting and covering material. Additionally, they
are very heavy and are great for holding trailing edge sheeting in place, etc. I also purchased a piece of aluminum extrusion from my local building supply.
I think it was 8' feet long, but I do not remember now. I cut a couple feet
off the end leaving me with a 6' straight edge. Because it is aluminum, it
will nick, but it is good for cutting long, straight pieces of covering. I
also clamp it to my table saw so I can cut straight sticks from sheets of wood.
Lastly I purchased a meter stick in
Germany that I have come to
love. It is aluminum with a steel edge. Inset into the back of the
straightedge are two neoprene (O-ring material) ropes that make it non-slip.
It works great for cutting pieces of covering where my other straightedges used
to slip.
-
Use
spray glue to attach 320 Wet or Dry sandpaper to
the back of straight edges to keep them from sliding around, but do not use
these straight-edges to cut plastic covering.
-
Rocket City makes pin clamps that I have used for
years. They are one of those really simple, inexpensive items that do what
they do very well. They are little plastic disks that you push onto a
T-pin. They are a very snug fit and are used to spread out the load when
pinning things in place such as sheeting on a wing. I highly recommend you
try them out.
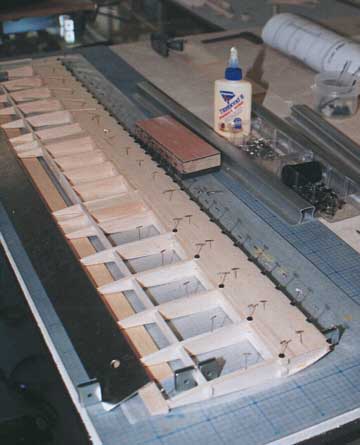 Other things to note in this photo: The trailing
edge is being supported by a scrap piece of trailing edge stock. A heavy
straightedge is holding the trailing edge of the wing down snugly while the
leading edge sheeting is glued on to prevent warps. Other things to note in this photo: The trailing
edge is being supported by a scrap piece of trailing edge stock. A heavy
straightedge is holding the trailing edge of the wing down snugly while the
leading edge sheeting is glued on to prevent warps.Magnets have been
aligned along the leading edge of the wing to keep it straight. At the top
of the photo, all the cap strips have been cut to length and are ready to be
glued in place. I find it faster to prepare them all and then glue them
all rather than cutting and gluing each one individually.
There are four sanding blocks in this photo. My
favorite is in the one made of oak. One side is faced with 1/16" neoprene.
The other side is faced with 1/2" foam rubber and is used to sand compound
curves.
The Tupperware container (top right) is holding all the hardware
for this model. My razor plane (top center) is laying on its side so the
blade does not tear things up and vice-versa. I was using Titebond II to
build this model and I have since decided that I really do not like it.
I have switched back to regular Titebond.
The little film canister in the clear plastic drawer
is great for keeping small parts from sliding under the plastic dividers.
I also use them for miscellaneous small hardware because I once tipped over the
set of drawers and then had to separate all the hardware again.
|
-
It wouldn't be difficult to make your own
clamps. I
spent about five minutes in my shop and found a simple method:
You will need a piece of scrap 1/32"
plywood, a
hand-held hole punch, a number 70 wire drill bit (available from hobby shops,
Micro-Mark or any plastic model supply company), small T-pins and some
CA.
You've probably already figured out how to make them from the list above.
If you use a different size T-pin, you will have to figure out what size bit to
use. You want the disk to be a tight fit over the pin so that when the pin
is pushed into the wood, the disk will apply clamping pressure.
The hole punch I have cuts disks from 1/32" plywood
that are very clean and can be used as is although I would probably use some
fine sandpaper to smooth the edges of the disks. Drill a #70 hole in the
plywood first and then center the hole punch over the hole by eye and punch out
the disk.
Push a T-pin through the hole in the disk and apply some CA to
the area around the hole on the side of the disk that will not be against the
work.
The CA will not stick to the chrome on the T-pin, but
it will keep the hole tight around the pin, otherwise the disk will quickly
become too loose to work as a clamp. Using this method, you could knock
out a hundred or more of these in an hour.
|
|

