|
|
Airbrushes and Spray Guns
Thinning the paint is not as difficult as many people imagine. There is not
a "magic" amount of thinner that needs to be added. The paint should be
about the consistency of skimmed milk up to about the consistency of 2% milk.
Properly thinned paints spray on smoothly, flow out quickly and look dry
within minutes. If the paint goes on wet but is very translucent and watery looking then it is
too thin. If it spits and splatters, goes on a like dry powder or fails to
spray at all then the paint is too thick or the spray tip is clogged which could
be due to the paint pigment being too coarse to pass through the tip.
The key to airbrushing is simply practice.
Reading about it only gets you started. I suggest you buy some artist's
watercolors that come in tubes and practice spraying poster board. That
will help you learn how to thin paint properly, adjust the airbrush and the air flow.
When you are
comfortable with that, practice painting patterns on the board. Finally
practice using cheap enamels on something non-porous.
When I start
spraying a color I usually shoot an empty soda can to make sure the paint is
thinned properly and the airbrush is adjusted correctly. Spend an
afternoon with your new airbrush, a couple jars of paint and it will all make
sense to you very quickly.
Airbrushes come in a variety of styles with an
equal variety of capabilities. If all you need to do is spray coverage
coats such as base or trim colors, then a single-action, external mix airbrush
with a medium and large tip will do everything you need it to. If you plan
to use your airbrush to weather your model, paint murals or spray very fine
lines then you will probably want an internal mix
airbrush with a fine tip.
If you are not doing fine artwork and you spend
over $100 on an airbrush then you are spending too much. You can get a
decent airbrush for under $50 by itself and from $60 — $75 in a set containing a
hose, a bottle or two and an extra needle/tip assembly.
I will break it down quickly and explain the
benefits of the various types. There are three basic features that define
an airbrush: Action, Mix and Feed.
Action
|
Single action |
The air/paint mixture is set before spraying.
Pulling the trigger back opens the air and the paint at the same time.
Most single action airbrushes are on or off. Some have a variable
trigger — the further back the trigger is pulled, the more paint and air
are released. |
|
Double action |
The air and paint are controlled independently
while spraying. Pushing the trigger down opens the air.
Pulling the trigger back releases the paint. If you are gifted and
coordinated (I'm not one or both of those things) then this type of
airbrush offers the most control while painting because you can change the
air and paint flow independently of one another. |
Mix
|
Internal mix |
Air and paint are mixed inside the airbrush
before it is sprayed. This style airbrush atomizes the paint into
smaller particles and produces a better spray pattern. They also are
capable of spraying finer lines. |
|
External mix |
Uses the siphon principle. Air is blown
over the paint tip (an open tube) and the paint is drawn out. The
paint and air are mixed on their way to the surface being painted.
They are easier to use and clean and are good for coverage coats.
As far as I know, external mix airbrushes
are always siphon feed. |
In addition to these there is also a turbo type
airbrush. I have no idea how these airbrushes work because they cost as
much as BMW. I think it is just another type of internal mix airbrush
though.
Feed
|
Gravity feed |
The paint cup is above the airbrush.
Gravity feed airbrushes allow less air pressure to be used and are good
for fine detail work that requires the airbrush to be close to the medium.
Many of these have built in color cups and do not have the option to use a
different size cup or jar. |
|
Siphon feed |
The paint cup is below the airbrush.
More air is needed than for gravity feed. These types of airbrushes
usually allow you to fit different sized bottles to match the task. |
If you have never used an airbrush then it is a
good idea to purchase an entry level unit. For model work, we usually
apply solid coverage coats of paint. This is exactly what a single action
airbrush is made for. Double-action airbrushes are used for artwork where
you might paint a stroke that needs more and less paint during a single stroke.
I purchased my double-action airbrushes thinking they would be more useful but
so far they have not been. I just do not need that much control. I
suggest you leave the double-action brushes to the artists unless you plan to
paint murals on your models. A variable trigger single action model does
everything I need it to do.
|
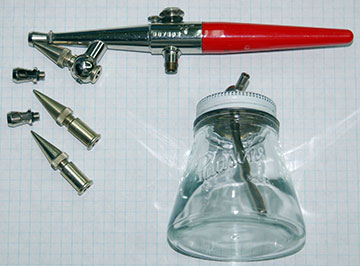
Paasche H model — Single action, external
mix, siphon feed. Good entry level, all-purpose airbrush. |
The Paasche Type H airbrush is the type I recommend
as a first airbrush.
The Paasche H is a single action, external-mix, siphon-feed airbrush. This
type has a bottle attached to the bottom of the airbrush
body and two nozzles. Air blows over the paint nozzle
suctioning the paint from the jar.
These type airbrushes
have a simple on/off trigger. The air is set to the desired pressure
at the air source and the mixture is set on the airbrush by twisting the
paint nozzle in or out to release more or less paint. Neither the amount of air or paint
can be changed while spraying.
I prefer internal mix airbrushes because of their superior spray
characteristics. They can also paint a finer line. The down side
is that internal mix airbrushes are harder to clean and less tolerant of dirty paint and poor
maintenance which is why I do not recommend them to beginners. |
|
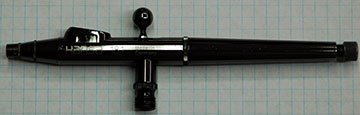
Hansa 181 — Single action, internal
mix, gravity feed. Good detail brush. |
The Hansa 181 is a single action airbrush having a trigger assembly that can vary the amount
of air/paint being sprayed. However, it is still single action airbrush because the air/paint mixture is set
before spraying — you can not independently control the air and paint.
You can always tell an internal mix airbrush by
the single nozzle. Single action airbrushes usually have an external
knob for adjusting the mixture. On the 181, the knob is at the rear of
the airbrush body. This model is incredibly easy to use and is my
favorite airbrush. |
|
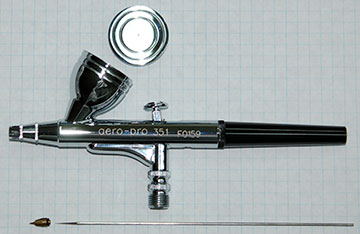
Hansa 351 — Double action, internal mix, gravity feed. |
The Hansa 351 is a double-action
model. It is similar to the 181 in that it is an internal mix with a
built in color-cup. This type airbrush is the most difficult to clean.
Be prepared to spend a lot of time cleaning an
internal mix airbrush. To be thorough it must be fully disassembled
because paint finds it way throughout the internal workings of the body.
Q-Tips are a great aid when cleaning an airbrush. |
|
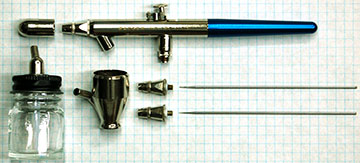
Badger 150 — Double action,
internal mix, siphon feed. |
The Badger 150 is a siphon feed airbrush.
These allow bottles of various sizes to be attached. My set came
with two or three bottles, one or two siphon caps, three needle/tip
assemblies and a color cup (more than is shown here).
The large nozzle puts out a lot of paint but I
would use it only for plastic models, very small R/C planes or trim and markings
on a larger model.
Do not use an airbrush for coverage work on larger
models. They do not hold or spray enough paint and the paint needs to be wet long enough to flow out.
Using an airbrush, the paint
begins drying long before you are finished and overspray creates a
dull, sandpaper-like finish. |
|

Aztec A470 — Single or Double action, internal mix, siphon or
gravity feed. |
The Aztec A470 is an internal mix everything airbrush. It can be single or double action and gravity or
siphon feed.
Even though it looks like a cheesy plastic toy, it is actually a good airbrush and is the one I use most. It
sprays nicely and is easier to clean than any of my other internal mix brushes.
The Aztec carries an unconditional replacement guarantee on the airbrush body
as long as you don't open it. I had mine about seven years when the
trigger broke inside the body. I'm not sure what happened because I didn't
open the body to find out. I called
Testors Corporation and
asked how to get it replaced. I was told to mail it in by certified mail.
I received a new airbrush body about two weeks later —
no questions asked.
|
|

Badger 400
Detail/Touch-up gun. Single action, internal
mix, siphon feed. Good for larger models. |
An airbrush and a spray gun are pretty much the
same thing except in different scales. For R/C models, I recommend a
spray gun similar to the Badger detail/touch-up gun (pint gun). It
holds more paint, sprays a larger pattern, and is the perfect size for this
type of work. The Badger is not cheap but it is an excellent tool.
You would probably have to talk to an auto refinisher or
someone who paints motorcycle tanks and helmets to get a recommendation for
other pint guns.
You can probably find something suitable at a local auto refinishing store
which is also a great place to pick up items such as extremely fine Wet or
Dry paper, quality masking tape and related finishing supplies that hobby shops don't carry or charge too much for.
For plastic models, a spray gun is way too
big unless you happen to be painting a huge battleship or something else
that is large scale. For example, I would probably consider using a
spray gun to put the base coats on a 1/72 scale B-52 bomber or a Tamiya 1/32
scale F-15. |
|
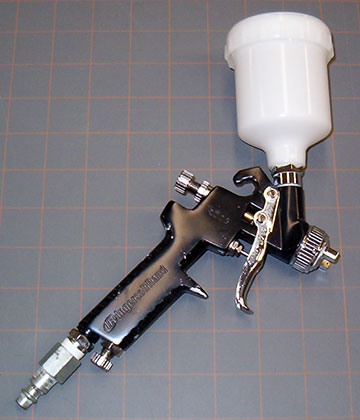
Ingersoll-Rand Gravity Feed Spray Gun |
I used my Badger 400 gun for a long time, but it is now
deceased. It developed a leak that I couldn't stop and didn't feel it
was worth spending more money on. Time for a new gun. I
decided to try a gravity feed gun and I'm very happy that I did. I
like this gun better than my Badger. It sprays better, is easier to
use and is much easier to clean.
I purchased mine from Lowe's. I think I paid about $60.00
for the gun shown here. |
Not shown here is the quart gun which is the same
as a pint gun with a larger cup. These are too big for most purposes
unless you are painting quarter-scale models in which case it is probably the best choice.
A relative new-comer is the High-Volume, Low
Pressure (HVLP) spray system. I have never used one so I can only repeat
what I have been told about them. The benefit is that they use much less
paint because the gun is pressurized forcing the paint out rather than the paint
being suctioned out. Less air is used and as a result there is less
over-spray and less wasted paint.
If you think an airbrush is small, the mess it makes is not. The
overspray goes everywhere. You can handle this in a few ways:
-
Airbrush outdoors
Not something I like to do for several reasons.
Particles in the air tend to land in the paint and you have to wait for
calm, sunny days. If I am spraying with a gun, then I spray outdoors
if the weather is cooperative. Even though I don't like it I do most of my spraying outdoors because there
simply isn't a way to keep overspray contained unless I want to spend a week turning my shop into something
like the government operation in the movie ET.
-
Buy or build a spray booth
Probably the best option, but booths sold
through the hobby industry are too small for R/C planes and they are
very expensive.
-
Drop Cloths
Cover the entire area, including the walls from
ceiling to floor. I cover the immediate area where I am airbrushing
with plastic to keep overspray contained. If I am using a gun and the
weather is poor, then I will cover everything I can with plastic drop
cloths in the shop.
|
|
|
|
Air Supplies
Your airbrush needs a compressed air supply. There are four types that I know of:
- Air compressor
- Canned air
- CO2 tank
- Inflated tire (for those of you having an old tractor tire
handy)
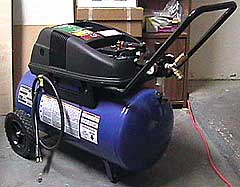 I personally recommend that you buy an
air compressor. A compressor has a ton of other uses in your shop
so you can not go wrong buying one. I personally recommend that you buy an
air compressor. A compressor has a ton of other uses in your shop
so you can not go wrong buying one.
Canned air gets
expensive very quickly. They do not last very long and you are sure to run
out in the middle of a painting session when all the stores are closed.
CO2 is a good choice if you live near other people
because it is quiet. If you use a spray gun then a CO2 tank will not last long.
I have heard a filled tank can last a year or so if you use it only with an
airbrush. I've never used CO2 but by all accounts there is one other advantage to it besides being
quiet. It's dry which means you don't need to worry about moisture traps. It's probably drier than using
multiple moisture traps between a compressor and the airbrush as I do.
The inflated tire would require too much jury-rigging to
get it work right and you still need some way to fill the tire — an air
compressor for example.
If you plan to use an airbrush, but not a spray gun, then you can buy a compressor
made specifically for airbrushing. These come in several varieties as well. The
most expensive of the lot are the silent compressors. They are what they
claim to be — extremely quiet.
There are two
reasons I have not purchased an airbrush compressor. First, they are expensive
— about 4 times as much as a larger, general purpose compressor. Second,
they can operate an airbrush but that is about it. A larger gun or air
tools require a larger
compressor.
A general purpose compressor can be used
for various other tasks such as inflating tires and operating air tools. One of my favorite uses
of an air compressor is to blow the dust out of a model structure prior to
vacuuming it. It is also great for blowing the dust from around hard to
reach areas like the stereo knobs in your car and your home system. Buy a blower attachment and turn the pressure up as high as it will go and
you are in business.
The down side is that these general purpose compressors are very loud.
If you live in an apartment you will tick off all your neighbors every time you
turn it on. I folded up an old blanket and put the compressor on top of
it. That absorbed a lot of the noise but it was still loud. Do not try to box your
compressor in. They get very hot and are air cooled. I suspect you would
burn one up pretty quickly if you tried to do something like this.
If you have space and the inclination you can build a closet to house your
compressor. When I said don't box it in I meant in a box that's only
slightly larger than the compressor. If you build a closet then you'd
probably need to ventilate it but it would cut down on the noise and probably
not overheat. A lot of people build the closet outside their home which
frees up the space in your shop and reduces shop noise. If you want to go
this route then research it first so you can find out what works. I've
never done it so can't offer any guidance here.
I also recommend that you buy a compressor with a built-in tank. The
tank prevents the airbrush from cycling with the engine. In other words,
it puts out a consistent flow of air rather than short spurts. It should
have an auto-shutoff so when the tank is full the compressor will turn off by
itself and not turn back on until the tank pressure falls below a certain PSI.
Before buying a compressor make sure it can put out the amount of air needed
by whatever you plan to use it with. Spray guns, airbrushes and air tools
have specific requirements — so many Cubic Feet of air per Minute (CFM) at so
many Pounds per Square Inch (PSI) that they need to operate properly. The
compressor will also list it is capabilities. Just make sure it all jives before plunking your money down. For example, Badger lists the
following requirements for the 400 gun.
|
Needle |
Flow Rate |
|
Fine |
1.7 CFM at 30 PSI |
|
Medium |
2–3 CFM at 30 PSI |
|
Heavy |
3–5 CFM at 30 PSI |
|
|
|
|
Spray Accessories
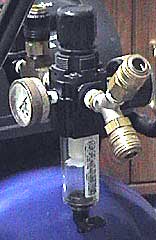 An
air regulator is a necessity to set the air-pressure for your airbrush or spray gun. Most regulators come
with a built-in moisture trap that is pretty much useless in my experience. They do trap some moisture but not
nearly enough. I often feel a cold water mist coming out of my airbrush. That's why I buy an inline moisture
trap that mounts near the airbrush or spray gun. Together with the regulator/moisture trap almost all water is
removed from the air and doesn't end up ruining your paint. An
air regulator is a necessity to set the air-pressure for your airbrush or spray gun. Most regulators come
with a built-in moisture trap that is pretty much useless in my experience. They do trap some moisture but not
nearly enough. I often feel a cold water mist coming out of my airbrush. That's why I buy an inline moisture
trap that mounts near the airbrush or spray gun. Together with the regulator/moisture trap almost all water is
removed from the air and doesn't end up ruining your paint.
Most regulators come with an air gauge and usually have a place to mount a
second gauge. An air gauge is not essential because
you do not need to know what pressure is being put out for your airbrush.
You adjust the air depending on how your airbrush is spraying. If you use
your compressor for inflating things then a gauge is a good idea.
I recommend you purchase a larger hose for
use with larger spray guns and other air tools. Put a female quick-connect
fitting on one end of the hose and a male on each of the tools so you can switch
tools easily with using wrenches. It is also a good idea to put a female
quick connect on the compressor after the moisture trap and male connectors on
all the hoses so you can switch these easily.
Always use Teflon tape on threaded connectors in
the air line to prevent leaks and unnecessary compressor cycling.
I have a Lazy Susan made by Rubber Maid
that I put my plastic models on for airbrushing. These are excellent for
this purpose because the part can be rotated to spray all sides without having
to pick the part up.
Extra hands are nice tools for holding
parts as well. These generally have a heavy base and two or three
alligator clips. You can make your own with alligator clips purchased from
Radio Shack that are crimped or soldered to pieces of coat hanger material.
The coat hanger is inserted into holes drilled into a scrap piece of wood such
as a 2 x 4.
|
|


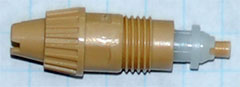 Aztec uses an entirely different method with their
airbrushes. The needle/tip assembly is already assembled and color-coded. There are needles for different
types of paints (acrylic/all others) as well as different effects (normal spray/splatter effect). The
instructions that come with the airbrush indicate what each color needle tip assembly is for.
Aztec uses an entirely different method with their
airbrushes. The needle/tip assembly is already assembled and color-coded. There are needles for different
types of paints (acrylic/all others) as well as different effects (normal spray/splatter effect). The
instructions that come with the airbrush indicate what each color needle tip assembly is for.