Airfield Models - Wing Construction Example

Preparing to Build a Model Airplane Wing

December 18, 2021


Home
About
What's New
History
Models Gallery
Model Building Safety
Articles
Mail & FAQ
Site Map
Site Feedback
Contact
Add to Favorites
Comments
Search Airfield Models

Back to Wing Construction Example


Airfield Models (http://www.airfieldmodels.com/)Preparing to Build a Model Aircraft Wing

The example I am presenting here is typical of almost all sport wings as far as order of construction goes.  However, some models may have unique items that must be installed in a certain order.

Study the instructions and plans to thoroughly familiarize yourself with the assembly sequence.  If you are building from a kit then I suggest that you sand the sheets holding the parts before removing them.  They will look nicer under a transparent covering.

If the ribs are die-cut, then it is almost always beneficial to sand the back of the sheet. That's the side that the die did not enter from.  This practice helps the parts fall out easier.  Never force die-cut parts from the sheet.  Unless a part falls out on its own, I almost always run a sharp X-Acto around the perimeter of every part to ensure they do not get damaged when they are removed.

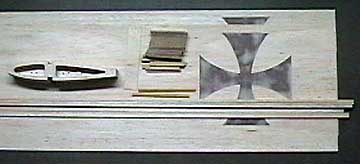
Identify all the parts and ensure everything is present.  If you are building from scratch or from plans then make a "kit" by cutting all the parts for the wing before you start building.  Having everything ready speeds up construction and helps it proceed smoothly.  Having a kit also helps prevent construction errors.

All modelers have built themselves into a corner at one time or another.  As a consequence we all have performed surgery on our models even though we really try to avoid it.  The best defense against this is familiarizing yourself with the construction and being patient.

Often mistakes are made because we want to get something glued in place so we can move along and skip a step in our rush.


Parts Needed to Build a Wing

  • Ribs

  • Spars

  • Shear webs

  • Sub-Leading Edge (if D-tube or sheeted)

  • Leading edge

  • Trailing edge

  • Balsa sheet if D-tube or sheeted.  Almost all wings have sheeting in the center at the least.

  • Wing tips

  • Plywood Servo hatches (if servos are mounted in wing outboard of fuselage)

  • Hardwood servo rails

  • Wing joiner material (plywood, fiberglass tape or tube-in-tube system)

  • Hinge support blocks depending on thickness of wing trailing edge

  • Wing dowels (located at leading edge if using bolts to retain wing or through the fuselage if using rubber bands)

  • Wing bolt support blocks

  • Tapered aileron stock or materials for built-up ailerons

  • Plywood to reinforce the trailing edge at the wing center whether using bolts or rubber bands to retain wing

  • Finishing materials

Make a kit before starting so assembly goes smoothly without interuptions to make parts.Creating the set of ribs is most of the battle when cutting parts for a wing.  Most other parts are simple rectangles, sticks or sheetsmost of which are glued to the wing oversize and then trimmed and sanded in place.

Shear webs can be made by cutting around a plywood template using a hobby knife.  A quicker way is to use a small table saw if you have one.  I also cut my own spars and other strip wood because it saves money and I have the means to do it accurately.  Prior to purchasing my table saw I bought all my strip wood from Balsa USA or the local hobby shop.

Please refer to these how-to articles that describe the process of creating some of the components used in this wing:

Also see


Tools Needed to Build a Wing

Before you do anything you must have a flat work surface to build on.  The wing will only be as straight as the surface on which it was built.  I use a magnetic building system or a wing jig, depending on the wing.  Most people build on a piece of ceiling tile or drywall , both of which work fine, but must still be on a flat surface.

If using a board then the construction methods only differ with the use of pins to hold parts in place rather than magnets.  Other than that the basic construction principles apply across the board. Being a genius has not made me rich for some reason.

Be warned that wing jigs are not automatic.  The holes in the ribs must be drilled extremely accurately or the wing will not be straight.

Tools

  • Hobby knife with spare blades.

  • Rules and squares.  If you want your wings to be straight then you absolutely need to have an accurate reference point.

  • A straightedge to trim true edges on balsa sheets.  A faster system is an Edge Truing Fixture.

  • A razor plane is nice, but not an absolute necessity.

  • Pins and Clamps

  • Drill with bits ranging from 1/16" to 1/4".

  • Tap set if using wing bolts.

  • Adhesives — I recommend Carpenter's glue for primary construction.  Use slow-drying epoxy for joining wing panels and installing landing gear blocks.

  • Sandpaper of several grades.  When finish sanding, start with 180 and work your way to 400 progressing one grit at a time.  Having several sanding blocks that are faced on each side is better than wrapping paper around a block which wastes paper and does not make for a flat sanding block.

    Leading edge sanders are never the right shape!

    I don't own one and won't use one.  All they guarantee is that every wing you ever use it on will have a leading edge that is the wrong shape.

    It's faster and better to initially shape the leading edge with a razor plane and then sand to final shape.  If you do not own a razor plane, then a leading edge can be sanded to shape.  Start with coarse paper to speed things up.

    An item that I find to be an absolute necessity is a long T-Bar sanding block to shape the leading edge and sand full span sheeting.  For example, on a D-Tube wing, I use the long block for the leading edge and trailing edge sheeting.


Previous —
Next —

How to Build a Wing for a Flying Model Airplane
Jigging and Dry-Fitting

Comments about this article


Back to Wing Construction Example
Airfield Models Home


Copyright © 2003 Paul K. Johnson