Airfield Models - How To

Make a Magnetic Building Board System to Build Model Aircraft

June 15, 2009


Home
About
What's New
History
Models Gallery
Model Building Safety
Articles
Mail & FAQ
Site Map
Site Feedback
Contact
Register
Add to Favorites
Tell a Friend
Comments
Design and Build Contest
Items For Sale
Search Airfield Models

Back to How-To Articles


Airfield Models (http://www.airfieldmodels.com/)Magnetic Model Aircraft Building Systems

I have been building on a magnetic building board for years and do not see myself ever going back to pinning things to a board.

Building with magnets is the best system ever conceived.  My thanks to Eldon J. Lind for introducing me to this idea.

Throughout this site you can see how I use this building system.  There are so many advantages to working with magnets that I can't document them all here.  Study various photos in the gallery to see how I use this system.


I build accurate model aircraft faster using magnets than with any other model-building system.

  • Fixtures and magnets quickly fine tune assemblies into precise alignment.

  • Magnets and fixtures are rigid.  They firmly secure and hold assemblies where I want them.

  • Magnets apply varying degrees of clamping force.  I join magnets using their own power for more concentrated force or spread magnets for uniform pressure over a wide area.

  • Magnets allow me to create accurate, stable and repeatable jigs on-the-fly.

My magnetic building system is simple, fast and very user-friendly.  It does what I want it to instead of fighting me each step of the way.

Knight Stik

Knight Stik is one of many models I've scratch-built using a magnetic building system.  It was designed on the board which meant a lot trial-fitting and adjustments.

The only way I know that parts fit is to fit them.  Magnetic jigging can be assembled, tested and disassembled in only minutes.  I know my jigs will work well in advance of using them.

See the gallery for photos of magnets in use.

Dry-fit using only magnets.

The fuselage dry-assembled using magnets and fixtures.

Structures can be removed from the board to do work outside the jig and then placed back in the jig exactly as they were.

I disassembled this structure several times when fabricating the kit.  All I had to do was move fixtures slightly away from one fuselage side while leaving the opposing fixtures in place.  Everything goes back into place exactly as it was.

A scratch-built "kit".

I can't imagine pinning all this together and then taking it apart to make adjustments just to pin it all back together again.  Model-building isn't about battling with pins.

I really don't like using pins to laminate edges.

Perfect conformity, nothing cracked and a strong joint.


The Minimum necessary for an effective magnetic building system:


Magnets

Ceramic magnets are the magnets to use.  They are large enough to be easy to handle and in the correct strength are unlikely to damage anything.  Ceramic magnets are available in a large variety of sizes and strengths.

Good ceramic magnets are not weak particularly latch-type magnets with steel plates attached.  The plates are poles that greatly increase the power of the magnet.

If the plates are removable then the magnet is dual-power.

The two drawbacks of ceramic magnets:

  • They can be broken if you're not careful with them.  Dropping or carelessly tossing them around the board is a good way to crack magnets.  Don't over-tighten hardware used to attach magnets.

  • If magnets and loose bits of metal (hardware, drill bits, pins, razors, etc.) are not kept away from each other you'll find all those bits every time you pick up a magnet.  This problem doesn't go away with other types of magnets.  An organized, uncluttered shop is a good thing no matter what building system is used.

Rare-earth magnets are much too powerful for model-building tasks.  At the correct strength they are very small and difficult to manipulate or remove.  They concentrate too much force in a small area.  Think about trying to separate small, powerfully-attracted disks and squares that are crushing your balsa.

Rubber magnets (craft and refrigerator) are very weak but may have their uses small stick models maybe.  I have some round craft magnets but haven't found a use for them.  The problem with them isn't their strength but that they are cheaply made.  The disks are obviously punched from sheet and have a tapered edge so they can't be counted on to hold anything square.

Electromagnets - All the magnets must be in place exactly where you want them when you turn on the juice.  All the magnets let go at the same time.  This system won't work well for us.

The 
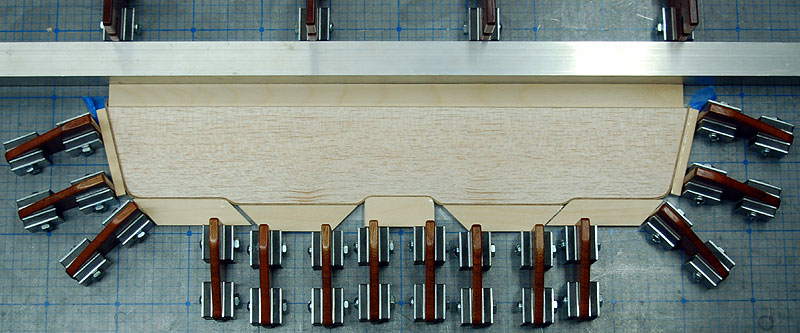
magnet that I have found most useful is a latch magnet.  These can usually be found anywhere cabinetry supplies are sold, but will be expensive if you buy them that way.

I purchase part number CA41LWH from The Magnet Source.  Each of these magnets is advertised to have 12 lbs of holding power with the metal plates attached.  I didn't measure the actual pull, but they stay in place - even when bending 3/8" square spruce.

The magnets are much less powerful without the plates, but are very useful in lighter duty applications.

Forty magnets will not get you very far when you get deeper into using the system.

If you're serious about building then I suggest you start with 100 magnets.  If you make your own fixtures you'll need 200 magnets.  A set of 20 fixtures uses 80 magnets.

When you start building a wing using 4 or more magnets to properly align each rib plus magnets to hold the spars, leading and trailing edges you'll understand why you need a lot of magnets.


Fixtures

I make fixtures from aircraft plywood.  They will last forever and can be passed to somebody else in the event you aren't immortal like I am.  You can use any flat, rigid material you like; masonite, cheaper plywood, plastic sheet, etc.

The vertical presses are made from hardwood.

Tall fixtures hold a wing in alignment.

Tall fixtures make it much easier to achieve accurate wing alignment:

  1. Draw a fuselage centerline on your board.

  2. Draw a wing line perpendicular to the fuselage center line at the approximate location of the wing leading edge.

  3. Mark a point on the wing line exactly the same distance from the fuselage centerline (halfway or more to each wing tip).

  4. Lock the fuselage to the board on the fuselage centerline using magnetic fixtures.

  5. Roughly center and align the wing using a tape measure.

  6. Place tall fixtures at the leading edge of the wing where you marked.

  7. Adjust the leading edge fixtures so that they are an equal distance from the wing line you drew.  Both fixtures should contact the wing leading edge.  If the wing is flexible ensure the jigs just touch the wing but don't flex it.

  8. Center the wing such that the wing tips are an equal distance from the fuselage centerline.

  9. Make sure each wing tip is an equal distance above the board and the wing incidence is correct.  The wing saddle may need to be adjusted by sanding or trimming.

  10. Check all your measurements.  Make adjustments as necessary.

  11. Lock the wing by adding a pair of fixtures at the trailing edge and one at each tip.  Use vertical presses mounted to magnetic fixtures to hold the wing tightly to the saddle if necessary.  Again, use as many fixtures as necessary to make sure the wing can't move.

  12. Drill and tap for the wing bolts.


Hardware used for fixtures

You can get all the hardware you need from a local hardware store.  Pick up #2 hardware used to attach the vertical presses from your local hobby shop or Micro Fasteners.

You'll need (2 ea) 10-24 x 1" bolts and nuts to attach magnets to the fixtures.  Washers aren't needed

The vertical presses are held in place with a 2-56 bolt, washer and lock nut.  In most cases the press doesn't need to be bolted to the press.  Just slide it on and use it.

The press part of the vertical press is a 10-24 x 2" thumbscrew (or whatever bolt head shape you feel most comfortable turning by hand).


The Building Bench is the foundation of all work done on it

Two steel building boards.Build on a Good Board

A good building board is common thin steel sheet that can be obtained from a metal dealer in your area.  The board on the right is 24" x 60".  It is nice having extra room to place fixtures and on-the-fly magnetic jigs.

I look for metal, scrap metal or recycling in the yellow pages.  Call around to let them know what you're looking for and get directions.

Good Boards are:

  • Undamaged
  • Flat
  • Coated
  • Receive magnets

Note: Some steels do not accept magnets.  Take a magnet or two with you when you pick out your board to test before you buy.

My board came from a piece having an undercoat treatment to prepare it for paint and that's how I use it.  I wax it before I start a new project to help glue and tape release more easily.  It doesn't rust so I don't have to look after it all the time when it's not in use.

Uncoated boards need to be to protected from rust - climate control, paint or frequent wax applications.

Sheet steel will conform to any acceptably flat surface that can support the board and the structure being built.  Undamaged sheet flattens under its own weight and does not require hardware, weight, adhesive or clamps.

Thick steel sheet or plate is heavy, difficult to handle and usually a poor choice unless you are building a half-ton bench having a permanent steel top.  If a thicker top is wavy it will probably not lay flat and will need to be milled.  I don't recommend you use a thick top unless you know something about metal working and understand what it will take to turn the plate into a flat bench top.

My building boards are slightly less than 1/16" (1.6 mm) thickness and I like them that way.  It's light enough that I can remove it easily when I don't need it.

The board dimension should be approximately one foot longer and one foot wider than the largest models you build to allow room around the model for magnetic fixturing.

Ask them to cut it to finished size and you should walk out smiling.  If the board has burrs around the edges the first thing you should do is remove them.  I use a file and finish with medium sandpaper.  Round over all four corners so they aren't snagging things like cloths, shop towels, covering, etc.  About 1/8" is usually good.

Do not buy a damaged board

If the dealer wants to give you a damaged board for free then graciously accept it and while you're there buy the undamaged board you still need.  A damaged board can be used as a storage board.

Inspect the board.  Turn it so one face is up.  Look over the surface and note how it droops.  Flip it over and check the other side.

Board Damage:

  • Doesn't lay flat on a flat surface
  • Dings
  • Dents
  • Deep scratches
  • Permanent waves
  • Kinks

A small steel board hung on the wall is an excellent way to store magnets and magnetic fixtures.If a board has any damage then put it back and check another.  Damaged boards aren't a bargain even when they're free.

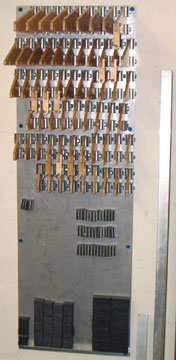
A storage board (right) is a very good idea.  It stores your magnetic tools where they stay together and are not attracting loose metal items in your shop.  Mine is mounted on a wall where it's accessible but out of the way.

Metal-Top benches and Tables

Some magnetic builders use a permanent metal bench top.  The only requirement is that the board is flat when you build.

Metal tables that are bent from sheet metal aren't flat.  That includes the expensive stainless steel type in restaurants.  If you look at them you will notice they are always billowy in the middle.  If you can find one that's flat then it's ok but if it's billowing at all it's not a building bench.


Magnets vs. the most used System - Pinning into Soft Boards

Like many people I was told pins were the way to build model airplanes.  They are a way to build but not the way to build.

I used pins for years but there were too many things I didn't like about them and I wanted something better.

  • Replacing pins in a cushion is tedious and time consuming.  Storing pins in a container meant having pins stuck in my fingers when retrieving one.
  • Pins do nothing for vertical alignment.  They hold parts to a board and to each other but do not apply clamping pressure more than a fraction from their location.  Pins are rigid for about 1/8" inch and from there they can't be trusted.

  • If wood is strongly resisting bending to shape, the first pins placed won't hold it and may split the wood.  That usually means weighting or clamping until pins are inserted.  Often the clamps are in the way of the pins being inserted.

  • Inserting a lot of metal-head pins heads through balsa wood and into boards using my thumb loses it's appeal pretty quickly.  Plastic pin heads have broken during insertion which sent the newly exposed bare metal end of the pin deep into my thumb or finger.

  • I mentioned above that magnets can suspend and clamp leading and trailing edges.  The pin way is to cross-pin through the leading and trailing edges at every single rib.  One magnet per rib instead of two or more pins.  It takes one minute instead of however long it takes to put all those pins in place.

  • Pins punch holes through the wood.  I don't find that objectionable until I accidentally bend a pin and it rips a big hole in the wood that can't be repaired without leaving an ugly scar which as far as I know could bring the end of the world.

  • A pin hole is only tight once or twice.  If I have to pin a part in place to dry fit it and make multiple adjustments then the pin won't hold securely when the part is glued in place because the hole has loosened too much.  That means I have to pin it differently than I did when I dry fit.

  • After a pin is in place it is difficult to fine-adjust the assembly without completely removing the pin and reinserting it in a different place.

  • I haven't found a surface into which pins are easily inserted yet hold with security.  I always feel I have to tip-toe around the model because bumping it might mean a bunch of pins coming loose.

  • My shirt sleeves snag on pin-heads protruding from the structure and usually pull the pin.

  • Boards that accept pins (ceiling-tile, drywall, etc.) are generally warped or curled and must be held to a workbench using weight, clamps, adhesive or hardware.  They also tend to decompose around the edges unless taped or sealed in some way that thickens the board around the perimeter.

Pins are fiddly, easily dropped and a danger to your body and to your animals who might think they are something to play with.

Safety

  • Please be very careful with dangerous objects in your shop.

  • Do not leave loose, sharp objects laying around.  Store tools safely when they aren't in use and put individual pins away as soon as removed.

  • Supervise your shop and keep visitors out of danger - particularly visitors who haven't developed common sense such as pets and that neighbor guy who causes a catastrophe every time he leaves his home.


In this series

Also see


Previous —
Next —

How to Paint a Scale Pilot Bust
How To Build A Computer Radio Setup Rig

Comments about this article


Back to How-To's
Airfield Models Home


Copyright © 2003-2008 Paul K. Johnson