|
|
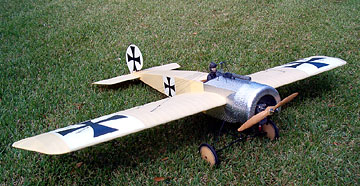
SR Batteries 1/4 Scale Fokker Eindecker E1
— Summary
What I didn't like
-
If you've read much on this site you already know
how I feel about lite-ply.
For each SR Eindecker kit produced, one lite-ply tree was plucked from a grove
of lite-plies then skinned, sliced into sheets and put in the box.
-
There is a lot of
laminating
to do that shouldn't be necessary. Laser cutting is not the answer to
everything. Lasers cut accurate parts from thin materials but burn too
much of the edge of thicker materials. Clearly some parts are laminated for additional
strength but most of the laminating is simply to gain thickness. A
traditional kit would have included thicker wood in most cases.
Laminating three pieces of lite-ply
together to make a small lite-ply block and then doing it 21 more times
(flying wire mounts and servo mounts) gets
old fast. I pulled out a chunk of hardwood, fired up my
table saw and cut
blocks to the proper size which saved me all kinds of tedium while ending up
with the material these blocks should have been made from in the first place.
-
I really don't like that the flying/landing wire mounting
blocks don't go all the way through the wing from top to bottom.
-
 The flying/landing wires are not adjustable if
assembled according to the instructions. Maybe it hasn't been a problem
with SR's prototypes, but in my experience cables will stretch with time. The only way I can
see to tighten the cables is to cut them off and make new ones every time they
stretch a little. The flying/landing wires are not adjustable if
assembled according to the instructions. Maybe it hasn't been a problem
with SR's prototypes, but in my experience cables will stretch with time. The only way I can
see to tighten the cables is to cut them off and make new ones every time they
stretch a little. I would prefer an arrangement that
allows the rigging to be adjustable. We went with Great Planes 4-40
locking clevises threaded onto a Dubro 4-40 threaded
rigging couplers. A more scale way to do it would be to use turnbuckles,
such as those made by Proctor.
The clevis pin is too small for the hole in the brass grommet of the mounting
plates. I cut small pieces of 3/32" tubing to slide over the clevis pin
and better bush the hole.
-
If you follow the instructions page-by-page you'll
do some things the hard way. For example at one point the instructions say,
"Finishing the hatch." A few pages later we're working on the hatch again.
Then a few pages later (again) we're back to hatch for the second time. In
one of these steps there are sticks glued inside the sheeted hatch. I
couldn't see
what I was doing and there's not an easy way to clamp these sticks (which are
responsible for holding the trapeze to the hatch). It would have been simpler
and better to glue the sticks in place before the hatch is sheeted.
-
I think the cockpit could have been closer to scale.
A nice touch would be to include instruments in the accessory kit.
-
A scale dummy engine would also be a nice option.
The only part that I really don't like to look at is the G26 in the middle of
the cowl. There is no way to look at it that it doesn't look very wrong.
There are mounting holes on the front of the G26. A little innovation
and access to a laser cutter could make this a nice accessory kit that's fun
to build and puts a finishing touch on the front end.
-
The "rib comb" was so flexible that I
didn't depend on it for accuracy. I
aligned the ribs over the plans using
magnetic
fixtures to hold the ribs square to the board.
-
Like a Ford, you can have your Eindecker E1 any
color you want as long as it's non-dyed, clear-doped linen. There simply
aren't many color schemes for the EI. You can cheat and use a scheme from an
EII, EIII or EIV. Most people wouldn't catch it. This isn't a
problem with the kit — it's a problem with the
type.
-
I think SR should be ashamed for even considering CA
hinges in a kit this nice. Have some pride in your model and use real hinges instead. Consider giving
the CA hinges to someone who can't keep a plane in one piece long enough for
hinges to fail.
-
I don't like the soft threaded rod that is fully
responsible for keeping the wings from falling off. I'd rather have a
type of mounting that is made from something stronger.
What I liked
-
The engineering is simple, well
thought out and elegant in its own way.
-
The instructions are very detailed.
-
The included balsa was very good.
-
The accessory package is very
nice. it includes a Williams Brothers Spandau machine gun, Williams
Brothers vintage wheels (Flair wheels are included now that Williams Brothers
is out of business), sticky-back aluminum for the forward fuselage, deck and
cheeks, antique SolarTex, pull-pull controls and all other hardware necessary
to complete the model. All the hardware provided is good quality and
does not need to be replaced. I
chose not to use the CA hinges, the plastic pull-pull control horns and the
steel bolts used to mount the landing wires to the trapeze. Hinges were
replaced as already indicated. Plywood control horns were fabricated as
replacements for the plastic horns. I used stainless steel bolts in the
trapeze assembly.
-
Constructing a true airframe from
this kit isn't a challenge assuming you have a large, flat bench.
-
The fuselage and horizontal
stabilizer utilize notched assembly to make alignment simple. For example,
the servo tray locks into the fuselage-side doublers and helps align the
fuselage in the process.
-
The upper fuselage deck is huge
and reveals volumes when removed. While adding a full cockpit
to the model would be a lot of work, you won't have problems finding places to
put your radio equipment while keeping it hidden from view.
-
The landing gear is nicely
reproduced and scale in appearance. It is also fully shock-absorbing.
I've heard bad things about the landing gear springing up on a hard landing,
grabbing the flying wires and ripping the blocks out of the wings. I
wrapped the bungee fairly snug because it wasn't too difficult to push down on
a wing until the tires made contact with the wires.
-
The aluminum covering is simple to
apply and looks very good. The SR website includes videos demonstrating the
application of aluminum tape.
SR has done a great job developing
this kit and it shows. I would not hesitate to build another Eindecker.
It's a beautiful model airplane and will be even more so if you take the time to
address details. If you want
something to rumple around for fun, this is your plane.
By the way, this model was built for my good friend, Mike Phillips. When
he ordered his kit he asked me if I wanted one. I declined because I own a
2-door sport sedan and didn't think I could get it into my car.
Now that I'm really looking at the problem, I think I know how to fit it.
I'm going to get him to bring the Eindecker for my visitation weekend and I'll
photograph the carnage so those of you who don't own tractor-trailers can see
that there may be a way to own this plane anyway. If I'm successful and you
buy the kit because of it, then you owe me a dollar. If you don't agree
then don't read the article when it's posted and figure it out yourself.
 |
|

