Using
the Hinge Sandwich Technique with Robart Hinge Points
I chose not to use the stock tail surfaces for my Miniplane. Although there
is nothing wrong with them, the plane needs additional
tail weight because I elected to use a larger than recommended engine. I
also do not
like the thick surface outlines.
I built surfaces having a 1/8" core with
1/16" x 1/4" ribs and outlines made from three laminations of 1/16" balsa.
The new surfaces are slightly stronger and heavier.
I have used this hinging technique on several models, including the tail
surfaces and ailerons for
Hammerhead.
This method guarantees that the hinges will be perfectly centered along the
hinge line.
-
Begin by cutting the outline of the surface(s) you want to hinge.
Hinge slots for the control surface and fixed surface can be cut at the same
time to ensure they align perfectly.
-
Use double-stick tape to attach the
control surface to the fixed surface such that the leading edge of the control surface is over the
trailing edge of the fixed surface.
-
Draw a pair of lines to mark each hinge locations. The
lines should be spaced the diameter of the Hinge Point. It is best to
locate the hinges at existing rib locations. The ribs will enclose the
hinge slots.
-
Taking leading and trailing edges into account, mark the maximum depth to
which the hinge will be inserted. It is better to
cut the slots too shallow rather than too deep. The holes can be drilled deeper later
if necessary. If the holes are too deep then you will add weight and waste
glue by filling the void.
-
Cut the slots
with a hobby knife or a scroll saw. Alternatively, the parts can
be pushed through a
table saw with the part standing perpendicular to
the table and the blade raised to the depth of the slot. Use a
miter gauge to push the parts through.
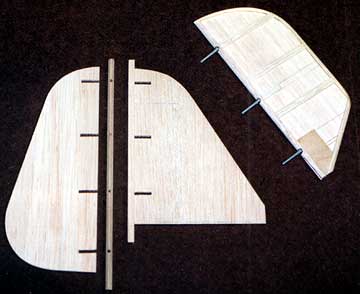
Note that the leading/trailing edges are
drilled to match the cutouts. On the right is a finished stabilizer half
with the ribs in place. The ribs cap the slots and hinging is finished.
|

