Airfield Models - How To

Edge Join Balsa Sheeting

December 19, 2021


Home
About
What's New
History
Models Gallery
Model Building Safety
Articles
Mail & FAQ
Site Map
Site Feedback
Contact
Add to Favorites
Comments
Search Airfield Models

Back to How-To Articles


Airfield Models (http://www.airfieldmodels.com/)How to Edge-Join Balsa Sheeting to make a Skin

Joining balsa wood sheets to make a skin is all but unavoidable for many flying model aircraft.  This is one of those tasks that seems deceptively simple just edge glue some sheets that are the same thickness, grain and roughly the same hardness or weight and you have a skin.

While that's basically all there is to it, accomplishing the task successfully is unfortunately more difficult than it sounds and is rife with hazards and pitfalls all of which are very visible in the final product.

Skin Defects

  • Unsightly gaps between the sheets.
  • Visible ridges at the seams.
  • Skin is sanded too thin in some areas which significantly weakens the skin and creates undulations.

All the above problems are nearly impossible to fix without replacing the skin.  Laminating new wood over a thin spot will usually make the problem worse, for example.

It is always better to discard a poorly made skin rather than forcing the issue.  Once the skin is glued to the structure it is hours of work to cut it away and sand off glue to get back down to the structure.  This is one of those areas where discipline and patience will pay off.

Always make the skin as a separate component if possible.  Some instructions indicate the balsa is joined as it is glued in place.  That is the worst possible way to join a skin and makes it very difficult to sand a smooth seam.

Better is to complete the skin including sanding prior to gluing it in place.  You should only have to do some touch-up and finish-sanding near the end of construction.


Preparation

What I've learned is that success in making a balsa skin, like so many other model building tasks, is a matter of preparation more than anything else.

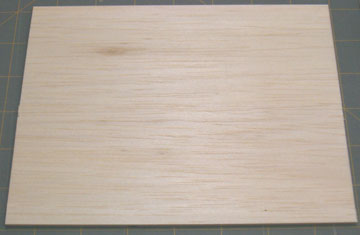
The first thing you should do is gather wood having the appropriate weight, grain and thickness for the skin.  Sheet wood can add a lot of weight to your model in a hurry.  Generally speaking the sheets you choose should be the lightest, straight-grained (A-grain) balsa in your stock.  A skin adds a lot of strength to the model as well.  Contest balsa is perfectly acceptable in most cases.

Matching Sheet Thickness

The biggest problem I had was that the actual thickness of balsa sheets varies enough that the edges sometimes have an extremely poor match.  Until I started paying more attention to this I had to do too much sanding which caused low spots and other imperfections.  The less you have to sand the skin to level the joints and smooth it the better it will be.

If you actually check your balsa stock you will find that that many balsa sheets taper slightly across the sheet.  This is something that happens at the mill.  That doesn't mean the wood should be discarded.  You can use it for components other than skins.

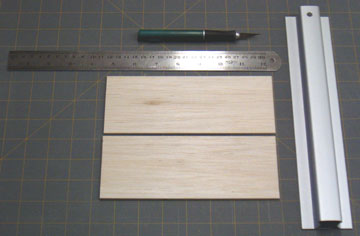
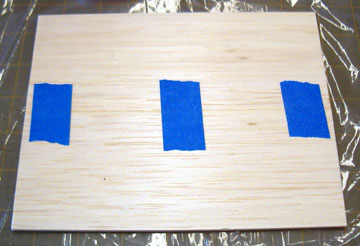
To determine if a sheet is acceptable check both of its edges against both edges of another sheet.  If any edge doesn't match then one or both of the sheets should not be used.  Select a third sheet and check both sheets against it in the same manner.  Continue doing this until you have enough sheets to make the skin that match reasonably well.

By the time you have selected your sheets, the thickness of both edges of any given sheet should match the thickness of both edges of every other 
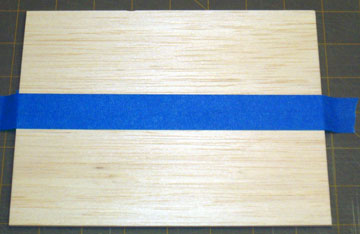
sheet for the same skin.  When you have enough sheets to make the skin that match within reason put them aside and repeat the above steps to select sheets for the rest of the skins.  A typical wing may need 4 skins, for example.

Ideally all edges of all sheets should match all skins used for matching components.  In other words, if you're making wing skins then all the sheets for the upper skin should also match all the sheets for the lower skin, but that may be asking too much.

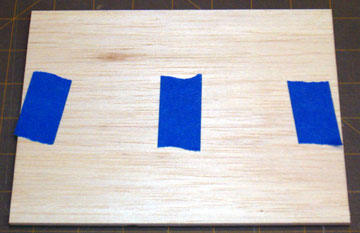
The next thing you should do is weigh each stack of sheets so they can be matched to help balance the wing.  If you selected the wood properly the skins should be fairly closely matched in weight.

It's up to you how anal-retentive you want to be about all of this.  I match each skin and then weigh the stacks.  If they're close then I move on.  If not then I mix and match sheets until the stacks are close to the same weight.  Now I check thicknesses again.  If they match then I move on.  if they don't match then I work on something else for a while and come back to it later.


Joining Balsa to Make a Skin

Now that you've selected the sheets more preparation is necessary prior to joining them.

Trim and sand the edges of the sheets such that they are straight and square.

True the edges of the sheets in preparation for joining them.  If the edge is severely out of true then I trim it straight using a straightedge and razor blade.  Trimming with a knife doesn't make an edge that's true enough to join.

I use an edge-truing fixture to sand the edges perfectly straight and square.  You can also use a long sanding block, but this takes some practice to prevent unintentional bevels or rounding over.

If you tightly pull two sheets together that do not have straight edges then the skin will buckle — a condition which is nearly impossible to sand out.

Check the fit carefully.  Adjust as necessary until the sheets fit perfectly. These two sheets are pressed against each other to check their fit which is now nearly perfect.

It's a good idea to mark the edges that join with numbers or colored markers so you know which sheets join to which.

Tape the sheets snugly together. Use short strips of masking tape to hold the sheets together.  They should be snug but not too tight.  If you pull the sheets too tightly together the skins can buckle.  It is also nearly impossible to press the joints flush.
Flip the sheet over and tape them with a single piece of tape running along the seam. Flip the skin over and apply a piece of tape the full length of the joint.
Gather glue, solvent and paper towels. Remove the tape from the first side so that glue can be applied in the seam.

Be sure to have a solvent for the glue handy as well as some paper towels.  A fast evaporating solvent is best.

Model airplane glue is the best adhesive for edge-joining balsa. I use traditional model airplane glue such as Ambroid or Sigment for joining balsa skins.  Nothing works better.  It dries fast, is plenty strong and sands easily without leaving unsightly ridges that harder glues will cause.
Remove the tape from the first side and open the seam. Open the joint so glue can be applied.  I like to use a few weights to hold the skin in place so I can use both hands to guide the glue.
Apply a liberal bead of glue to the seam. Apply a liberal bead of glue in the joint.
Press the sheet down flat on the building board. Close the joint immediately and press the skin flat on the workbench.
Use solvent to wipe up all excess glue. Put some solvent on a paper towel to clean up all the glue that oozed out of the joint.  This will save you all kinds of problems.  For example, if you do not do this and simply start sanding the joint, glue blobs can break loose and leave deep gouges in the skin.

While you're wiping up the glue be sure to press the joints as flush as you can get them.

Tape both sides of the sheet using tape running across the seam. Allow the solvent a short time to evaporate.  Apply strips of masking tape across the joint.  I flip the skin over to remove the tape running along the joint and replace it with tape going across the joint for two reasons:
  • The glue will dry faster.
  • The solvent in the glue will melt the glue on the tape leaving melted tape goo on the wood.

When the glue has dried thoroughly remove the tape carefully to avoid gouging the wood.  If there is tape goo or excess glue outside the joint then quickly wipe the joint with more solvent.  Don't overdo it or you'll melt the glue in the joint which may cause the sheets to separate.

Be sure to sand the skin before gluing it to the structure. Although it's not shown here you should always sand both sides of the skin before gluing the skin to the model.  Be sure to level all the joints and get the skin as smooth as possible.

If you can't level the joints when the skin is flat on your workbench then you'll never get them level after the skin is glued to the model.

Use a large sanding block starting with relatively coarse sandpaper.  I normally begin with 120 or 150 grit and work my way to 220 grit sandpaper prior to gluing the skin on.  Always sand with the grain.  Leave finish sanding until the skin is in place and the model is nearly complete.

When properly done you should not be able to feel any seams in the skin. A nice gapless skin.  This is the upper hatch of an SR Batteries Fokker Eindecker.

Unfortunately, the laser-cut skins don't match in color, but it shouldn't be a problem in this case because the deck will be covered with aluminum.

By the way, I've never seen laser cut wood with edges that match as closely as I'd like them too.  Additionally, if you don't sand the burned edge away then the seam will be very dark and will probably show through most film coverings.


Previous —
Next —

How to Make a Set of Ribs for a Tapered Wing
Make Lattice Wing Skins for Model Aircraft

Comments about this article


Back to How-To's
Airfield Models Home


Copyright © 2005 Paul K. Johnson