|
|
|
|
How
to Disassemble a Model Aircraft Engine
Before you consider disassembling an engine you should have a very
good reason. Every time an engine is taken apart there is the risk of
doing more harm than good.
Likewise, if you don't have a very good reason to disassemble the
carburetor then leave it alone — even if you disassemble the rest of the engine.
Leave the needles alone because you don't want to change the settings
if you don't have to. The only reasons for taking an engine apart
are:
- An internal component is damaged such as a broken connecting rod.
- A part is worn and needs replacement such as bearings or the piston
and liner.
- The engine was crashed and dirt got inside (very unlikely).
- You are curious and it is worth the risk of damaging it to see what's
inside.
- You are writing a how-to article for your website.
|
|
|
|
Taking the Engine Apart
Note: Information contained in the instructions supersedes
information presented here. Be sure to review the parts diagram and
instructions that came with your engine before taking it apart.
Remove the engine from the aircraft. Use a stiff bristled brush to remove as much dirt from the outside of
the engine. If you have an air compressor then it works well to blow
dirt from the engine. Gather up necessary tools, a couple clean rags, a can of
light machine oil, a container to put small parts in and another container filled with
whatever cleaning solution you plan to use. I normally use
denatured alcohol.
This article will not cover cleaning the engine, but if you want to do
that, then a good method is shown
here.
Important! Never use any type of metal
tool or object inside the engine.
Be sure to make a small scratch
on the head and the cylinder before you take it apart so you know how it goes back on. Do the
same thing with backplate.
|
|
|
|
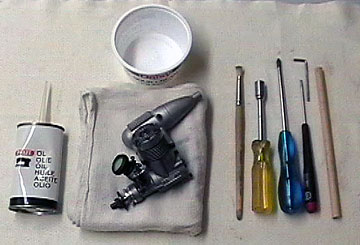 |
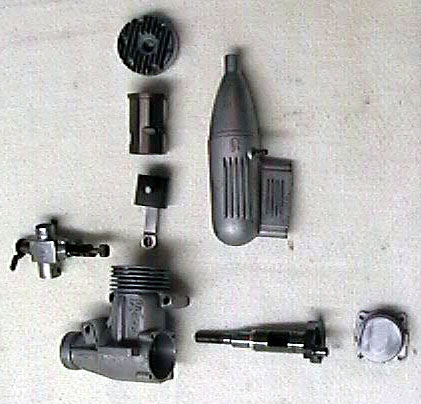
A few items needed to take the engine apart. Lay out
a clean rag and use a second rag to wipe oil from the parts. A
toothbrush is helpful for removing varnish (cooked engine oil). A hardwood dowel is
useful for a couple of purposes that will be discussed later. |
 |
Begin by removing major items such as the air filter,
muffler, carburetor, propeller, prop nut and washer, thrust washer and the glow
plug. Put small items in a container so they don't get lost.
Do not put items from inside the engine in the container. You don't want to scratch the piston, liner, crankshaft or anything else that
needs to have a smooth, precision surface. |
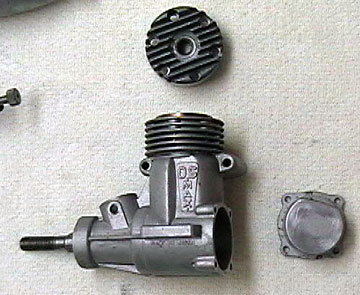 |
Remove the head and backplate. Normally there are more bolts
for the head than the backplate. Put the bolts in the container.
If the head and backplate have the same number of bolts and they are
different sizes, then be sure to note which are which so you can put
them back in the proper location. There is a good possibility that the
backplate gasket will tear when taking the engine apart
— particularly
if the engine has a lot of hours on it. Making a new one is
simple.
How to make a
backplate gasket When the head has a gasket it is usually made
from thin metal. Put the gasket somewhere safe so that it doesn't get bent or
damaged. |
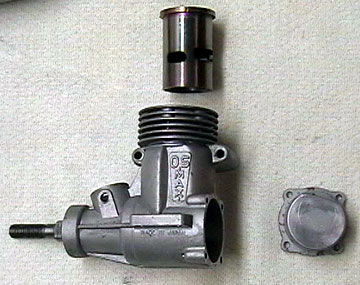 |
Often there is an alignment pin in the top of the cylinder that is
used to key the liner. If not, then mark the liner and cylinder so
that it can be reassembled facing the exact same way.
Most engines are designed to have the liner removed
before the piston can come out. If the liner will not slide out,
then push on it from underneath with the dowel.
If it still will not come out, then put the engine in a 300° oven for
about 10 minutes. The aluminum will expand from the heat and the
liner will slide right out. The heat will also melt varnish which
could be making the parts stick together. |
|
|
|
|
Important!
Before removing the piston, look at it from the top and through the
backplate opening. Often the connecting rod has an oil hole in it and
goes on one way.
After the engine has been run, the piston is mated to the cylinder and
should go back in facing the same direction. If it is turned around,
the engine will lose compression and wear out faster.
|
|
|
|
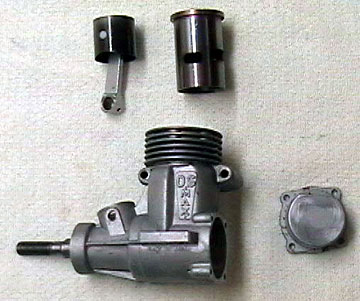 |
Typically the piston needs to be as high as possible to
be removed. Turn the crankshaft to move the piston up. To
remove the piston, tilt then engine backward and pull the connecting rod
from the crank pin. Turn the engine upside down and let the piston
fall into your hand.
Don't remove the piston ring unless you plan to replace it.
Some pistons have small circlips holding the pin in place.
If you want to remove the pin, then use a pair of needle-nose
pliers to carefully remove the circlip. Put it someplace safe
because the engine is out of service until the clip is replaced if it gets lost. |
 |
If the crankshaft does not slide out, then set the back
of the engine on a piece of wood. Put another piece of wood over
the crankshaft and tap it lightly with a rubber mallet. It should
come out easily. If it does not then 10 minutes in the oven should
loosen it up. Some engines have a key holding the thrust
washer. These engines must have the thrust washer pulled off first
with a bearing puller. The key is then removed and then the
crankshaft.
My O.S. 1.08 is like that. I pounded on the crankshaft for
several minutes before looking at the parts diagram and realizing that
no amount of hammering was going to knock the crankshaft out until the
key was removed. Live and learn.
 |
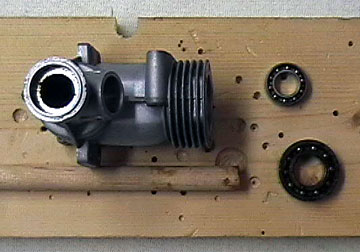 |
Usually the ball bearings do not come out easily.
Find a wooden dowel that will can be inserted through the back of the
engine and push the front bearing out. Again, heating the engine
makes removal easier. The rear bearing is removed by rapping
the engine against a piece of wood. If the engine is heated it
should fall right out.
The engine is now ready to be cleaned, have parts replaced or
whatever work done that is necessary.
|
|
|
|
|
|
|
|
|
Back to Model Aircraft Engines
Airfield Models Home |
|
|
|
Copyright © 2003 Paul K.
Johnson |
|
|

