Airfield Models - Model Aircraft Engines

How to Assemble a Model Aircraft Engine - Part II

December 19, 2021


Home
About
What's New
History
Models Gallery
Model Building Safety
Articles
Mail & FAQ
Site Map
Site Feedback
Contact
Add to Favorites
Comments
Search Airfield Models

Back to Model Aircraft Engines


Airfield Models (http://www.airfieldmodels.com/)How to Assemble a Model Aircraft Engine — Part II

This is the second part of an article describing how to assemble a 2-cycle model airplane engine.


Alignment notch on cylinder liner In days of old, you had to carefully align the ports of the cylinder liner with the crankcase.  Any misalignment meant lost power or an engine that wouldn't run.

Modern engines almost always have some type of key that make aligning the liner goof-proof.

Photo showing how notch in cylinder liner aligns with pin in crankcase Here you can see how the liner keys to the crankcase.

Be sure to give the liner a good coat of oil inside and out before you insert it.

When the liner is inserted, you will have to jiggle the piston to get it to enter the bottom of the liner.  If it does not slide in easily do not force it - it is not aligned properly.  If you damage the piston it will have to be replaced.

A piston/liner assembly should always be replaced as a set.  If you replace one of these items - replace both.

The cylinder liner properly aligned and seated in the crankcase After the piston is in the liner, slide the liner all the way down so that it is keyed properly and fully seated.
The engine head and gasket ready to be mounted on the engine At this point you can put on the head or the backplate.  I chose the head.

Shown here are the head gasket with the head ready to be assembled to the engine.

Photo showing the correct sequence to tighten the bolts down to ensure the head is properly seated and sealed

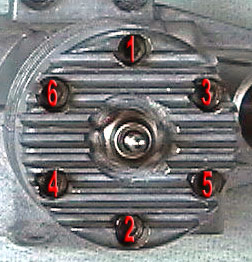
Read this carefully!

The bolts holding the head on the engine must be evenly tightened and the head must be properly seated.

Hold the head down on the engine and thread each the bolt in until it starts to tighten.  Back the bolt out one full turn.  Repeat with each bolt.

Using the number order shown in the image, tighten each bolt in approximately 1/4 turn.  Do the same to the next bolt.  Repeat this until the bolts start to feel snug.  Continue tightening using 1/8 turns.  Finally snug the bolts.

The pattern is a criss-cross to ensure the head is flat on the liner and sealed properly.

Do not excessively tighten the bolts or you will strip the threads in the aluminum case.

Photo showing the correct sequence to tighten the bolts down to ensure the backplate is properly seated and sealed Use the same method to attach the backplate.
Attach the carburetor by pressing it down to seal it while tightening the mounting bolt(s) Attach the carburetor by pressing it down firmly to ensure a good seal while tightening it.

Again, be careful not to strip the aluminum threads the bolts go into.

The completely assembled engine The completely assembled engine.  Generally there is no reason to put the muffler on now if you plan to put the engine in a plane immediately.  You will just have to take it off again to put the engine mounting bolts in.

Before you run the engine, ensure that it turns over with no binding.  If it does not appear to have compression, that may or may not be a problem depending on the engine type.  If the compression is significantly different than it was before you took the engine apart then you should try to find what is different.

If all seems well, then the engine should run with no problems.  After a few runs you should remove the engine from the plane and ensure all the bolts are still snug.  Sometimes they loosen slightly after the engine has been assembled (some people say) although I have never had this problem.


Previous —
Next —

How to Assemble a Model Airplane Engine Part I
Radio Control Systems for Model Airplanes

Comments about this article


Back to Model Aircraft Engines
Airfield Models Home


Copyright © 2004 Paul K. Johnson