Airfield Models - How To

Make A Pushrod Exit Drill Guide

December 19, 2021


Home
About
What's New
History
Models Gallery
Model Building Safety
Articles
Mail & FAQ
Site Map
Site Feedback
Contact
Add to Favorites
Comments
Search Airfield Models

Back to How-To Articles


Airfield Models (http://www.airfieldmodels.com/)How to Make a Pushrod Exit Drill Guide

Almost every Radio Control model I have built has needed pushrod exits cut for the rudder and elevator.  
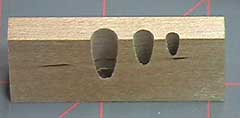
Many R/C models have really ugly pushrod exits, but that bothers me.  I like to make the exits as small and neat as possible.

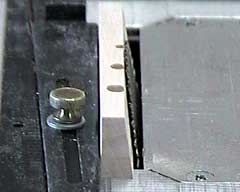
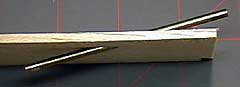
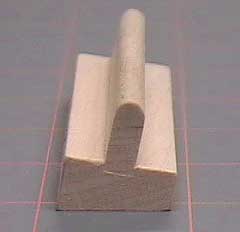
My normal method has been to mark the exit on the fuselage side and then drill a hole at each end.  Then the holes are connected by cutting between them with a razor knife leaving a relatively neat hole.  That has worked fine for the most part, but still seemed unnecessarily tedious.

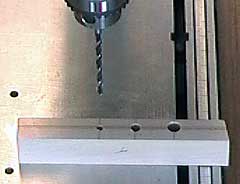
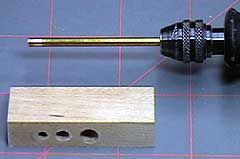
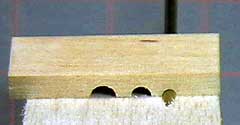
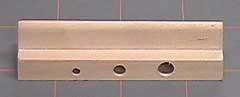
I decided to make a drill guide to accomplish the same task.  The first guide I made was cut at 15° which turned out to be too steep for most of my aircraft.  A second one was made at 10° which works, but would still be better a degree or two shallower.  It might not be a bad idea to make guides from 5° to 15° in 2-1/2° increments.

It's been a while since I originally posted this article.  Having used these tools with several models I can say I am very glad I took the time to make them.  The results I achieve with them are much better than other methods I used in the past.


All holes should be along the same centerline. Square the faces and ends of a piece of hardwood.  I use maple motor-mount stock.

1/8" (wire or cable), 3/16" (NyRod) or 1/4" (for 3/16" Carbon fiber tube) pushrod exits are routine so those are the sizes I drilled.  Use whatever size(s) you think you will use.

This fixture does not have the holes on the same centerline. Set your table saw to approximately 8° - 10°.  The first guide I made was cut to 15° and turned out to be too steep for most purposes.  It will work with shorter, wider fuselages that taper more sharply at the aft end.

Note that this fixture does not have the holes on the same centerline.  That means that each hole will put the exit in a slightly different position (fore to aft).

These holes are properly aligned along the centerline.

Center all the holes along the same line.  Set up the saw to cut the holes in half where the drill bit will exit the guide.  Now you can simply align the edge of the guide where the center of the exit should be in the fuselage.

This fixture does have the holes along the same centerline and is how it should be.

A countersink can be used to sharpen brass tubing to cut clean holes in balsa. I sharpen brass tubing to cut clean holes in balsa.  A counter-sink does a good job sharpening tubing, but minor touch up will be needed with a small file or sanding block because the tube tends to flare or "trumpet" slightly.
A Moto-Tool can be used to drill the holes. You can glue a piece of rubber tubing on the end of the brass so you can grip the tube and cut the hole by hand.  I find chucking it into a drill or moto-tool works well and is faster.
The fixture in use. Here you can see how cleanly the hole is cut.  There is no chewed up balsa as there would be if you try to use a standard bit.
A view of the angle at which the hole is drilled using the fixture. A view of the bit in place, but with the drill guide removed.
A view of the angle at which the hole is drilled using the fixture. Still another view.  Again, this is the 15° guide.  Most exits should be shallower.
A handle makes the jig a little easier to work with. This is the 10° guide.  A handle makes it easier to grip.  A piece of sandpaper glued to the underside helps prevent slipping.

Note that the holes are not centered along the same line.  This is how not to do it.  center all the holes along a common centerline and it will be easier to use.

Dado the base to strengthen the glue joint. The base is dadoed to receive the handle.


Previous —
Next —

How to Make a Razor Hole Saw
Build a Fixture to True Balsa Wood Sheet Edges

Comments about this article


Back to How-To's
Airfield Models Home


Copyright © 2003 Paul K. Johnson