![]()
|
|
|
|
|
|
|
|
|
|
|
|
|
|
|
|
|
Damien Nott's Ugly Stik flight video
|
|
|
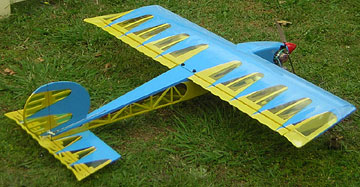
Images and text are Copyright Damien NottTo be honest I was never really taken with Das Ugly Stik. It was very prolific at the club where I first started flying — every man and his dog seemed to have one — and being young (and a bit naive), I swore I’d never own one. I always wanted to be different. After giving the hobby away for around 10 years or so I came in from the cold. The first thing I noticed was that ARF’s had become very commonplace. Most of them looked great but there was a sameness about them. I still want to be different. That said, I’m on my second ARF of recent times. There were 2 major considerations before laying down some plans and cutting some wood. One, what was I going to build? Two, how was I going to build it? I had only just joined a club, and knowing that I was going to build my “second model,” I felt that I could have it finished about the same time I became competent enough to handle it. My attitude toward Das Ugly Stik had softened somewhat in my time out of the hobby and when I found some CAD plans on the ‘net. I immediately downloaded them into my collection (as it turns out, they’re someone else’s interpretation of the Stik). Experience from my previous builds showed me that I desperately needed some kind of jigging system so that I could build aeroplanes instead of bananas, and once again, the ‘net came to the rescue. Airfield Models fell into my sights and I spent ages reading the articles, seeing not only an excellent jig system, but also seeing it used by a master. At the same time, I saw how a bit of creativity and imagination could change an ugly duckling into a swan — Rustik. By this time I’d narrowed my choices down to four models with Das Ugly Stik in the mix. I’d been corresponding with Paul for a while and also picking the brains of the more senior members at my club. One piece of advice clearly stood out — The Stik is an excellent choice for a second model. Indeed, the plans I had would’ve made for a fairly easy build, but I wanted to challenge myself a little even if it meant drawing the process out a bit longer. With the phrase “lighter is better” rebounding inside my head I started to re-draw.
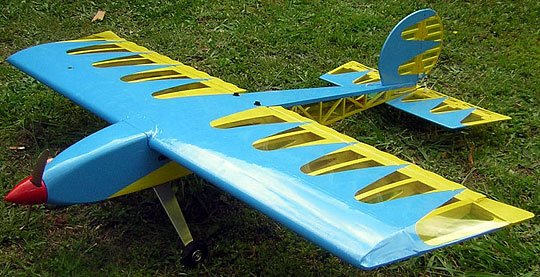
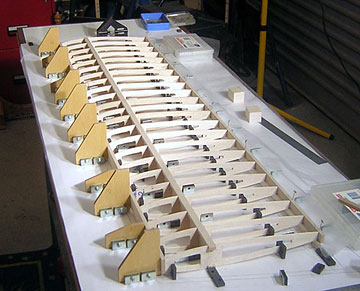
The first thing I built was the wing. I made a D-tube wing because I’ve built a handful this way before and it was a nice comfortable way to get started. It differs from wings I’ve built in the past in that it has no dihedral, there are 2 servos to operate the ailerons and it has built up ailerons. The most difficult part of the construction was making the ailerons. In all, I ended up making 2 sets of leading edges and 3 sets of skins — double-sided tape can be a curse as well as a blessing! Initially I was going to make the fuselage out of balsa sheet similar to Rustik but I also wanted to make this thing as light as I possibly could. My last model weighed around the 3 kg mark and sorta-kinda flew — poor design and poor construction — so I really wanted build something better. As I was drawing the internal framework I figured I could make some gains by building truss sides from behind the trailing edge and sheeting the top and bottom. Once I’d drawn the trusses in I started thinking that it would look better if the top and bottom were trussed as well and so that’s how it ended up.
The entire building process took around 6 months, give or take, juggling work, family, other interests and taking a few “deep breaths” before trying something new. It wasn’t always easy, but it wasn’t anywhere close to as difficult as I thought it would be. At this time the Stik has had 3 flights and I’ve flown it once. The contrast between my trainer, an OS-46LA powered Phoenix Classic, and the Stik is very noticeable and has highlighted the performance differences between different types of aircraft design in a very tangible way. Prior to this, I could see other models flying and what they were capable of but it wasn’t until it was my thumbs on the sticks that I started to understand what it’s all about. The following was written after my Stik flew for the first time. I feel that building, be it from a kit or from scratch, puts you in the model when it flies. It challenges you and sometimes frustrates you, but then you put something into the air that just looks so right and you can say, “I made this!” and at that moment, you capture something of what the Wright Brothers must have felt all those years ago at Kitty Hawk.
|
|
|
Damien sez...Beware of disorientation. It turns this:
|
|||||||||||||||||||||||||||||||||||||||||||||||||
|
|
|||||||||||||||||||||||||||||||||||||||||||||||||||||||||||
|
|||||||||||||||||||||||||||||||||||||||||||||||||||||||||||
|
Copyright © 2006 Paul K. Johnson |


 I should note that it was initially my
intention to simply convert the plans from inches to millimeters and start
building. The first change was the wing followed by the fuselage then
the tail feathers and before I knew it I’d reworked the plans from nose to
tail.
I should note that it was initially my
intention to simply convert the plans from inches to millimeters and start
building. The first change was the wing followed by the fuselage then
the tail feathers and before I knew it I’d reworked the plans from nose to
tail.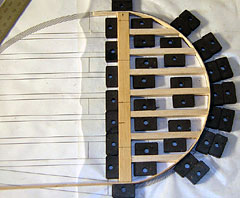 Once I’d finished drawing the fuselage I
looked at the tail feathers. Having a solid sheet tail and stabilizer
seemed to be a bit of a shortcut when compared to the fuselage
— why go to all the trouble of building a light
fuselage if you’re just going to throw a couple of slabs of wood on the end
— so they were built up as well. The fin
and rudder posed a bit of a problem: how to achieve the curved edge,
particularly on the fin. In the end I used a similar method to Paul’s
Rustik, laminating strips of balsa to form the edge.
Once I’d finished drawing the fuselage I
looked at the tail feathers. Having a solid sheet tail and stabilizer
seemed to be a bit of a shortcut when compared to the fuselage
— why go to all the trouble of building a light
fuselage if you’re just going to throw a couple of slabs of wood on the end
— so they were built up as well. The fin
and rudder posed a bit of a problem: how to achieve the curved edge,
particularly on the fin. In the end I used a similar method to Paul’s
Rustik, laminating strips of balsa to form the edge.