Workbenches
There are three parts to your work bench: The bench top, the
frame and legs and the building surface. The building surface
should be a separate, replaceable component.
I think a good bench must have several qualities.
It must be
as absolutely flat as you can get it. Most of the components of a model aircraft are built on the board
and will only be as straight as the surface they are built on.
I use
jigs as much as possible but some parts need to be built on a flat
surface. If you do not use jigs then all the parts need to be
built on a flat surface.
The bench itself must be flat to begin with but in most cases it will not
remain flat unless the frame and legs can keep it that way.
I can not stress enough the importance of having a solid, stable
bench.
 Good work
benches are heavy. You will be cutting, sawing and sanding parts on the
bench. If it is not heavy and well braced it will tend to move around which
is not only annoying but actually increases the amount of work you end up
doing. Good work
benches are heavy. You will be cutting, sawing and sanding parts on the
bench. If it is not heavy and well braced it will tend to move around which
is not only annoying but actually increases the amount of work you end up
doing.
Any movement by the bench is work force taken away from the
component you are working on. Bench movement also increases the chances of
slipping and making mistakes.
If you decide to use a card table as a bench then do not be surprised when
things keep falling off of it due to it shaking when you start sanding or
sawing.
My carpentry skills are nothing to brag about so you should probably consult
with a local cabinet or furniture maker for techniques to building a good frame
for your workbench. My approach in the past has been to use 4" x 4" legs
with a 1" x 6" frame.
The bench was trussed and the legs had
adjustable supports to allow me to level the bench. I never really trusted
that the bench wouldn't begin to sag in the middle but mine held up fairly
well.
You will want your work bench surface to be as large as possible.
I have never heard of or seen a bench that I thought was too big. A larger
surface allows you to build more components at the same time. This is
important to me because I primarily use slow-drying glues.
I can glue up
one assembly and then move to the next while waiting for glue to dry. You
will need room to fabricate and work on individual parts, so you do not want your
entire bench to be used by the component you are building.
My first "good" building surface was made from a heavy, solid-core
door. It lasted for years and never warped. I got rid of it when
I joined the service because I knew I would be living in barracks and did not see
any point to dragging it all over the world with me. It wasn't absolutely
flat but it was close enough.
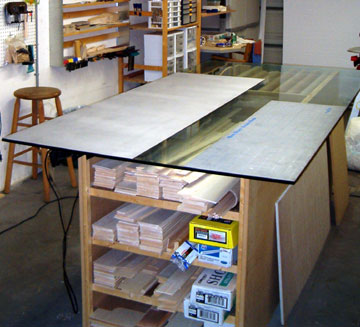
My current workbench has a 1/2" x 4' x
8' tempered glass plate on top of a 3/4" MDF bench/storage unit. It wasn't cheap
but it is the best bench I have ever owned. I spent quite a bit of time
leveling the glass. Even though the bench is square, it can flex and the
shop floor isn't even close to being flat.
It is extremely important that the bench top is flat, so taking the time to
get it that way is time well spent. In my case, that required several
strategically places shims. I have to check it every so often because the
shims are wood and can slowly be crushed over time. Although it's not as
important as being flat, being level is also nice so that things like
round-handled knives aren't always rolling off the bench and into your foot.
If you have the room, set up your work bench so you can access it from all
sides — especially if using a larger bench. I originally had my bench
against a wall which made it difficult for me to reach across it
— especially
when using a jig that raised the component several inches above the surface.
There are several times I managed to snap a piece off a wing that was in my Ajusto-Jig when trying to reach across it.
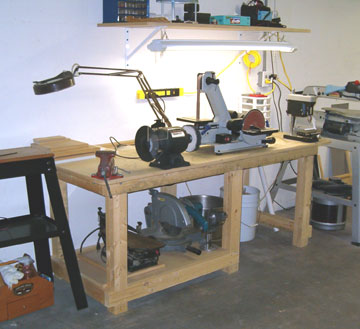
At the top of the photo you can see a desk that I use for fine detail work.
I like to stand when doing general construction, but when I need to do very
fine, delicate or precise work, then I find I have better control when sitting.
I also build plastic models at this desk.
|


 In model building there is "clean" work and "dirty" work.