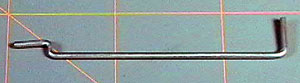
Airfield Models - Hardware for Flying Model Aircraft

L-Bends and Z-Bends

December 19, 2021


Home
About
What's New
History
Models Gallery
Model Building Safety
Articles
Mail & FAQ
Site Map
Site Feedback
Contact
Add to Favorites
Comments
Search Airfield Models

Back to Model Airplane Hardware


Airfield Models (http://www.airfieldmodels.com/)L-Bends and Z-Bends

L-Bends and Z-Bends are inexpensive and are some of the strongest and most reliable connectors there are.  They have an extremely low failure rate and are very long wearing.  I have never seen one fail in use.

Wire can crack when bent which can lead to failure.  These cracks are usually very visible and in most cases you will feel the wire crack when you are bending the wire.  The point is that you should know if the bend is ok or not immediately.


Working with wire

L-Bends and Z-Bends are made from music wire, threaded rod or another type of solid rod.  I personally do not make bends from anything other than music wire because it distorts less than softer wires.  Note that music wire cracks more readily than softer wires.

Music wire is inexpensive and can be purchased from most local and online hobby shops.  I stock at least a couple pieces of every available size.

Cutting wire

I use side-cutters to cut 1/16" and smaller music wire and to cut threaded rod up to size 4-40.  I should use an emery wheel on a Dremel tool for all music wire because even 1/16" music wire will ruin side cutters.

For larger sizes of wire nothing works better than the emery wheel.

It is generally a good idea to cut a generous length to make it easier to work with.  Excess length can be trimmed off later.

Cleaning and deburring

I suggest that you get in the habit of always deburring wire immediately after cutting it.  That includes not only the piece you plan to use but also the leftover piece you put back in your stock.  Wire that is not deburred ruins control horns.  It shreds the nice molded bearing surface as it is forced through the hole.

Use an emery wheel to square the end and deburr it.  Hold the wire at a 45° angle to the wheel and spin it to remove the burr.

Use fine (0000) steel wool to clean wire.
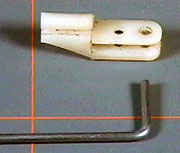
Bending

Work slowly when bending wire.  What is happening is that the molecules in the wire are warming up during the bend and will allow you to keep going once you start.  The outside of the bend is stretching and the inside is being compressed.  Don't bend wire around sharp edges!  If you use your vice, then face the vice with a piece of something hard that is radiused.  A good hardwood works well for up to 1/8" music wire because the force required to bend the wire is enough to crush the wood only so that it creates a nice radius that the wire likes.

If you bend heavier wire you will need a metal face having a shaped radius.  The best way to go is buy an inexpensive wire bender with hardened pins and a good lever.

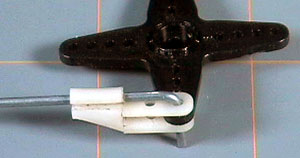
Back to small wire for pushrods...

No matter what you do, don't try to crank the wire over in one swift motion.  The cold wire will crack and even if it doesn't, the wire is significantly weakened.

When you start bending keep going until there is a little more to go.  If you think you can stop in the exact right place then do it.  If the exact right place is tough to gauge, then stop short of it.  Check the bend against whatever it will mate with to see how much more it needs to go.

Because the wire is already partially bent you do not need to apply force near the bend to prevent the wire from bowing.  Hold the wire slightly farther out and use the spring action of the wire to help get bending started again.  If you can't get the bend right in 3 attempts, then cut off the end and start over.


L-Bends

A Z-Bend and an L-Bend

A wire having a Z-bend on one end and an L-Bend on the other.

If  a bend cracks from stress when you are making it, then cut off the end and try again.  Do not use a wire with a cracked bend.  It is a good idea to make bends before attaching the wire to the pushrod.  Then if it takes a few tries to get it right you do not have to readjust everything.

The Z-bend above is a good start but it is not finished.  The end of the bend is not parallel to the wire and will drag on the horn.  The end can be bent up slightly without the bend itself being damaged or cracked.  if it were much worse there is no way to bend it back without damaging one of the existing bends.

The end is also too long.  The end should be about 1-1/2 times the thickness of the horn.

L-Bends

An L-Bend should be used only when the pushrod is very close to being in the same rotational plane as the horn.  In most cases an L-Bend can be bent to a very small angle from 90° to prevent binding.  Too much of an angle makes the L-Bend want to pull out of the hole.  If whatever is holding it in gives up, then the model is history.  A 90° L-Bend with a properly attached retainer won't let go.

L-Bends are retained using wheel collars or a Quick Connectors.  A Quick Connector is made of nylon and has two arms that slide over the horn.

The L-Bend is placed through a hole in one of its arms, then through the horn and through the second arm.  The wire is then rotated into a catch in the Quick Connector which prevents the L-Bend from coming loose.

Quick connectors are easy to use — even for beginners.

A very nice way to make an L-bend is to solder the right size washer on the end near the bend with the solder fillet on the bend side of the washer.

The washer should be perpendicular with the wire so that it bushes against the horn properly (flat).  The wire is inserted through the horn and secured with a wheel collar.  A little wire should protrude past the wheel collar.


A Quick Connector and Wire with an L-Bend. A Quick Connector is used with a wire having an L-Bend.
A Quick Connector attached to a Servo Arm. Quick Connectors are very easy to use.  Note that the L-Bend shown here is too long and should be trimmed so that it protrude past the connector approximately 1/16".

Also note that the servo arm pointed to the left will interfere with the linkage and should be cut away.

Z-Bends

Z-Bends can be made to allow the pushrod to come into the horn at a slight angle.  I mean very slight like less than 7° degrees or so.

Z-Bends are self-locking and do not require additional hardware.  This makes it the least expensive connector there is and it's one of the strongest and one that gives people all kinds of trouble trying to make.

Z-Bends are widely used, but often criticized because inserting a Z-Bend in a nylon horn can distort the hole.  While that is true, it does not have to be.  Again, always make sure the ends of the wire are smooth and deburred.

I never make a Z-Bend in any wire larger than 1/16".  Some people make Z-Bends in 2-56 threaded rod material, but it is soft and distorts more than music wire which will result in more distortion of the hole it goes into.  Additionally, many people do not use the correct size drill bit to enlarge holes in horns.  Instead they wallow the holes out with a hobby knife.

If the hole is the proper size and you insert the Z-Bend slowly and gently, the nylon will stretch slightly as the bend goes through the hole, but it will return to its original shape.

Unfortunately, Z-Bends tend to be difficult to make.  The best way to make Z-Bends is to use a dedicated bender.  Z-Bend pliers are sold in most hobby shops and online stores.


Previous —
Next —

About Pushrod Linkages for Model Airplanes
Nylon and Metal Clevises

Comments about this article


Back to Model Airplane Hardware
Airfield Models Home


Copyright © 2004-2006 Paul K. Johnson