![]()
|
|
|
|
|
|
|
|
|
|
|
|
|
|
Hinging is often one of the last steps to completing the model and the urge to rush through it and finish the plane can be over-whelming. Resist the urge, take your time and do it properly. Also see
|
|
|
Sealing Hinge GapsA sealed hinge prevents air from leaking through the hinge line. An unsealed hinge line can cause trim problems and will make the control surface less effective. It is preferable to seal all hinge lines with tape or an iron-on film or fabric. The seal can be a piece of packing tape adhered to the bottom of the surface. It is easy to do. Try it on a plane you have now that does not have sealed hinges and you will see how much a difference it makes. If you like the response your plane currently has, then you will find that you can reduce the control throws to get the same response after sealing the hinge lines. This means less load on the servo and less drag to perform the same maneuvers. To Seal a Hinge GapOnly one side of the hinge line needs to be sealed assuming the seal is not the hinge as when using Monokote hinges. Monokote hinges are addressed farther down on this page. Thoroughly clean the surfaces so the tape will adhere properly. Cut a piece of packing tape off the roll a little longer than the length of the hinge line. Stick the tape to a clean piece of glass. Cut the tape so that it is approximately 1-1/4" wide. That width will allow about 1/2" to be adhered to both surfaces. Deflect the control surface all the way up and push the tape into the hinge line. Burnish it down to both surfaces, flex the surface back and forth to ensure it does not bind. For long surfaces, such as strip ailerons, it is sometimes easier if you have a helper. Get a straightedge and put the non-stick side of the tape over the edge so that it is centered lengthwise along the edge. With each person holding one end, push the straightedge into the hinge gap and then rock it back and forth to stick the tape to both surfaces. Remove the straightedge and burnish down the tape.
|
|
|
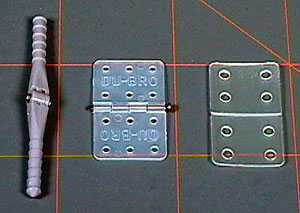
Flat HingesFlat hinges come in a variety of sizes for all types of model airplanes. Only the smallest of model aircraft have surfaces that are too thin for a flat hinge. Very thin surfaces use Monokote hinges, sewn hinges or thin Mylar. There may be other ways of hinging thin surfaces as well, but you would have to talk to someone who is more familiar with micro-flight than I am. Pinned HingesThis is a type of flat hinge that has a real pivot point - usually a steel pin. At times when I use flat hinges, I almost always use the pinned variety. I like using a hinge that is a real hinge rather than a bendy piece of plastic. If you look at any full-size aircraft, you will notice that the hinge line is partially inset into the control surface. The only type of hinge that allows this same setup in a model aircraft is a pinned hinge (flat or Hinge Point). I admit that in flight I can not tell the difference between a pinned hinge and a non-pinned hinge, but I just feel better about using real hinges, so I do. Polypropylene Hinges (Also called Poly or "Live" Hinges)These hinges are also excellent and very long lasting. They almost always have a stamped hinge line. The best ones available are made by Hayes. I use poly hinges at times, but generally prefer Hinge Points or pinned hinges. I still have some poly hinges in my shop, so I will use them eventually because there is nothing wrong with them. The good thing about poly hinges is that they last forever and tend to be on the stiff side. This stiffness helps dampen flutter. Before you install poly hinges, you should flex the hinges back and forth many, many times to loosen them up. Most experts agree that it is important that you pass the time spent loosening the hinges by continuing to read all this site has to offer. There are two things about poly hinges that I do not like. Due to their stiffness, they tend to prevent the ends of the surface farthest from the control horn from having the same amount of throw as the surface has nearest the control horn. This behavior is most noticeable on longer surfaces such as strip ailerons using torque rods near the wing root. On the other hand, if a small amount of resistance from the hinge prevents the surface from deflecting properly, then air loads in flight will probably do the same thing even with a pinned hinge. In other words, this is probably more of a problem with the control system than the hinge system. The second thing I do not like about poly hinges (and even more so with CA hinges) is that they put the hinge line in front of the leading edge of the control surface. Although there is nothing wrong with this in practice, it is not really is not where the hinge line should be. This is a direct assault on my anal-retentive nature so I fight back with pinned hinges. Nevertheless, poly hinges are good hinges and they will provide good service. CA (Cyanoacrylate) HingesThese hinges are made for lazy people. (I wonder how many people
just got offended and went off to another web site). You know it's
true, so stop being offended and start using real hinges.
CA Hinges are made from a strip of Mylar with a piece of thin cloth or paper laminated to each side of the Mylar. They are called CA hinges because they are intended to be glued in place using cyanoacrylate. The porous laminate is what the CA actually adheres to. However, epoxy can also be used. The only advantage CA hinges have over other types is that they are so thin that you can shove a hobby knife into the surface and that is your hinge slot. Other than that there are so many things wrong with them that it is hard to remember them all. The first thing that comes to mind is that they require you to deliberately leave a larger gap between the flight and control surface than would be necessary with any other type of hinge. This gap is necessary to prevent these hinges from breaking. The larger gap and the thin, flexible hinge material combine to allow the surfaces to flex up and down - sort of like what a belly dancer does by panning her head side-to-side. Control surfaces are not supposed to be able to move like that, but it is a fundamental and defective property of CA hinges. Second, and more importantly, CA hinges have the highest failure rate of any type of hinge in the history of hinges. Some people will take issue with my comments regarding these hinges stating they have never had problems with them. I am sure many people have had good service from CA hinges. The fact remains that CA hinge failures are reported frequently, to include everything from the laminate delaminating (followed by loss of the control surface) to the hinges breaking. When other types of hinges fail it is usually a building error - not a hinge failure. For example, any hinge can pull out from the surface due to improper gluing. I just do not like CA hinges and strongly suggest that you use any other type of hinge instead. In fact, this is the only type of hinge I will specifically not use. Pinning HingesI suggest that you always pin flat hinges for security. Do not confuse pinning hinges with pinned hinges. Pinning refers to using a toothpick or straight pin to secure the hinge to the flight or control surface with the pin centered in each half of the hinge. The proper way to do this is to glue in the hinges and attach the control surfaces per usual. After the glue is set up, drill a 3/32" hole all the way through the surface and the hinge. Push a round toothpick through the hole and then use a single edge razor blade to carefully trim off the excess. A drop of thin CA will secure the hinge forever. You can either put a drop of fuel-proof paint over it to match the covering or, if using iron-on covering, put a scrap between two pieces of paper and use a hole punch to make dots that can be ironed over the pins. I kind of like how the pins look so I tend to leave them exposed. I do not use straight pins because they are harder to trim nicely and glue does not stick to them. However, I have used them in the past and they never came out so they work fine. A hole does not need to be drilled if using straight pins. Just push the pin through and trim off the excess. Many people say that they have installed flat hinges with glue and no other reinforcement and have had no problems. I can say the same thing, but I always use pins now. It is a little more work, a lot more security and one less thing I have to worry about. A pinned hinge will never pull out without taking other parts with it. The choice is yours, but if you ignore this advice, then you better be sure that you know how to glue a hinge in properly.
|
|
|
Hinge PointsHinge Points were first released by Robart and were an instant success. They are strong, reliable and very easy to use. Rather than cutting a slot for a flat hinge, you simply drill a hole. Of course the same rules apply to Hinge Points as to any hinge regarding alignment. Hinge Points are my favorite type of hinge and the first hinge I use unless there is a specific reason I can not use them. For example, a narrow, highly-tapered surface, such as a strip aileron, may make using Hinge Points a poor choice. The Hinge Point may only be able to partially inserted before it goes through the outside faces of the control surface, thus requiring the Hinge Point to be shortened significantly. Although Robart states you can cut a Hinge Point down to 2 barbs, I would not trust the life of my model to this. In cases like this I use pinned, flat hinges.
|
|
|
Film and Fabric Hinges
Film and fabric hinges are kind of neat in that they provide a full span hinge that also seals the surface. This type of hinge is often referred to as a Monokote hinge. I have not used these hinges extensively, but the few times I have used them they gave me good service. I trust film hinges on small or slow aircraft, but I would not use them on any airplane that has significant flight loads on the control surfaces or one that flies at higher speeds. The only thing to be careful of with film is that if the film starts to tear, it will continue to tear - probably all in one shot if the plane is in the air. Be sure there are no nicks or cuts in the hinge line at either end of the hinge. Inspect film hinges before every flight. You can use a soldering iron to slightly melt the hinge line at both ends to help prevent tears. There is another alternative if you use fabric. You can sew to pieces together with the outsides of fabric placed together. Sew right down the center and then iron the hinge to each surface. Another way to use cloth hinges is to simply glue them over and under on each control surface. In this case, you can use almost any cloth that will accept glue. This is an old method that does not see much use any more, but these hinges last forever as well.
|
|
|
Thread HingesThread hinges are another old hinging method. These are very easy to do, extremely flexible and very long lasting. These are probably the hinges of choice for very thin control surfaces. To make a thread hinge, mark hinge locations as you would if you were using a flat hinge and then sew a figure 8 pattern having about 6 stitches. Adjust the number of stitches based on how much strength is needed. Secure the hinges with glue.
|
|
|
Home Made HingesThere are no specifics here. Home made hinges become necessary when no other hinge will work. Generally, you would only make your own hinges for a scale project so that if the hinge is exposed it replicates the appearance of the scale hinge. If the hinge is not exposed, then it replicates the movement of the control surface. For example, scale Fowler flaps require a hinge system on a track so that the flap moves rearward and rotates down at the same time. By the time you are building an aircraft that requires custom hinges, you will probably have enough experience to know how to accomplish the task.
|
|
|
|
|
|
|
|
|
Copyright © 2004 Paul K. Johnson
|
|