Airfield Models - How To

Build Crates to Ship Model Aircraft

December 19, 2021


Home
About
What's New
History
Models Gallery
Model Building Safety
Articles
Mail & FAQ
Site Map
Site Feedback
Contact
Add to Favorites
Comments
Search Airfield Models

Back to How-To Articles


Airfield Models (http://www.airfieldmodels.com/)How to Build Strong, Lightweight Shipping Crates

While I was in the service (Army) for nearly 10 years, every model I built was destroyed by movers.  I made the mistake of letting movers pack my models instead of doing it myself.

Even though I told the moving company in advance that they would need to supply crates the movers always showed up with nothing to pack the models invariably stating they were never told about it.  Of course my packing appointments were always two days before I had to leave and they couldn't make an appointment to come back and do it right.

My last move was when I left the service from Germany.  I packed all my plastic models and video taped the movers as they packed the rest of my property.  That move was the only move where none of my models were damaged.

Unfortunately, I don't have full size tools to make crates with.  Additionally, I do not ship enough to get the discounts that larger companies get.  Therefore, making plywood crates would cost a fortune to ship in many cases more than the cost of building the model.

I decided to make crates using 2" foam insulation.  Insulation is available from any home improvement store.

At first I cut the foam using a circular saw and jig saw.  This method made the biggest mess imaginable.  One time I cut the foam on saw horses in my driveway.  The wind carried the foam dust and bead to my neighbor's yard which soon looked like Christmas day as it became completely covered with foam beads.  I felt pretty stupid vacumming their yard with a Shop Vac.

When cutting indoors the static beads stick to everything.  They are so light they float around the shop forever and there is no place they don't go.  I had to sweep and vacuum them from all over the shop including the walls and ceiling.  I'm still finding foam bits all over the shop.

It didn't take me long to despise making crates and almost got to the point of deciding I would only build models for customers within driving distance so that the model could be picked up or delivered and no crating would be necessary.


Making a Hot Wire Cutter

Admittedly I don't know jack about making a hot wire cutter.  I searched the internet for answers and found that a lot of guys are using 
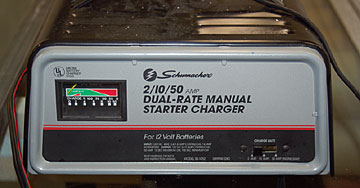
car battery chargers for a power source.  My charger puts out 2, 10 and 50 amps.  I think it still needs some type of rheostat because it seems to get too hot even at 2 amps.

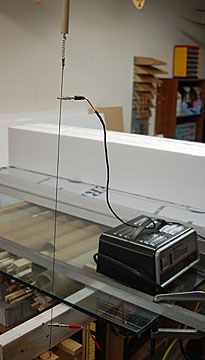
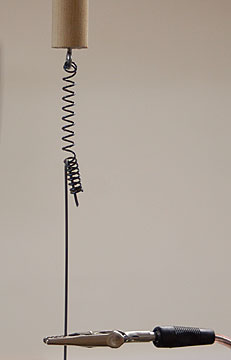
I'm open to suggestions for improving my hot wire cutter from you guys who have more experience with this.

Power Source for Hot Wire Cutter This is what I'm using for a power source.  It works, but seems to be too powerful.
Attach end to dowel suspended from the ceiling. I threaded a hook into both ends of a hardwood dowel.  There is a cup hook in the ceiling to attach the dowel.  The hook that the hot wire connects to has a spring to provide tension.

When the wire heats up it expands and loses its taughtness.  The spring helps keep the wire taut.

I experimented with several diameters of music wire.  Thin wire, such as .020 broke too easily.  I found that 1/16" wire works pretty well but it can also break if over-heated or if the work is fed to fast.

The hot wire turns red hot so be very careful and be sure nothing flamable such as solvents, paper, family members or pets are too close.

Heat causes the wire to expand and lost its tension.  A spring helps keep the wire taught. A close up of the spring tensioner used to keep the hot wire taut.
The opposite end of the hot wire has a hoop bent into it to receive a screw. The opposite end of the hot wire has a loop bent in it to receive a wood screw that threads into a board clamped under my workbench.  A long screw allows the wire to be tensioned.

The distance between the power leads changes the temperature of the hot wire.

My hot wire is too long which allows it to flex too much.  Obviously my system needs more development but it works well enough.  I'll probably need to make an L-shaped arm so I can use a shorter hot wire.

Caution!  Unplug the power source between setups and when cutting is complete.  The wire heats up almost instantly so when it's plugged back in there is almost no wait before you can use it.

Pre-cut boards to build the crate. I clamped an aluminum extrusion straight edge to my bench to ensure consistent cuts.  Again, the wire is so long that it tend so make wavery cuts but it's a lot better than using a circular saw.
This crate has three compartments separated by three shelves. I made "2 x 2's" to provide shelf supports and to reinforce he corners.  The sides and supports are glued using a thin bead of polyurethane glue and then pinned with bamboo shish kabob skewers.

Various fill pieces are made to separate components.

The lowest compartment houses the stabilizer and miscelleneous parts.

The stabilizer and hardware rest on the bottom of the crate and are padded using shredded paper.

Loose pieces are taped in place using clear packing tape.

The first shelf pinned in place with bamboo skewers. The first shelf was pegged but not glued.  Skewers that need to be pulled out to remove the shelf are clearly circled so the customer knows how to take the crate apart without damaging the contents.
The fuselage rests on the first shelf and is padded with shredded paper. On the first shelf are the fuselage, flaps, engine, tank and spinner.  Shredded paper was used to pad the fuselage.  Foam peanuts were used to pad the engine.
The second shelf supports a brown paper wrapped wing. The second shelf was pinned in place.  The wing was wrapped in brown paper to keep shredded paper from entering the lead-out area and pushrod exit.

More shredded paper is used for padding.

The crate lid being pinned in place. The lid was glued and pinned with more skewers.  Bamboo skewers are inexpensive and can be purchased at local grocers or Wal-Mart.
Mark removeable pins.  The pins come out easily with a needle-nose plier. Again, the removable skewers are circled.  Skewers that are not meant to be removed are not marked.
Fiberglass tape provides additional security. For additional security the entire crate was wrapped in fiberglass tape.
Because this crate is designed to be opened from the top be sure to mark all sides clearly. This crate is meant to be opened only from the top so the tops and bottom are clearly marked.  Instructions for opening the crate were e-mailed in advance and also included in the crate.
Wrap the crate in a cardboard shell to prevent it from chipping apart during shipment. The entire crate was wrapped in cardboard from packing boxes to create a hard "shell."

The entire cost of building this crate was about $25.00 in materials.  I do charge for time because it takes me about a day to make a crate like this.

I charged $50.00 for materials and labor.  Insured shipping via USPS cost about $75.00 for a grand total of $125.00.  I haven't figured out how hobby shops can ship monster ARF boxes for $20.00 but I'd sure like to know.

A different approach to building a crate. The Great Planes Tutor was packed differently because the tail was glued on which made the crate much larger than it would have been if the tail was left off.

Strategically located formers were placed to prevent parts from moving around.  No other padding was placed in this crate as everything was secured well.

Build compartments in the crate to prevent small items from moving around or tape them securely. Extra hardware was put in this box.  The box and landing gear were taped in place using packing tape.
Same thing for the propeller.
Plans pinned using more skewers. A couple bamboo skewers hold the plans and instructions.
The fuselage is secured with formers having cutouts. Formers were cut out to lock the fuselage in place.
The completed crate interior. Everything in place.
Turn the crate over to the friendliest postal employee.  Offer to give him a quarter if he takes care of it respectfully. Take the box to your friendly postal employee and you're done.

The Tutor box cost about $55.00 to ship.  I charged about $40.00 for materials and labor.


Previous —
Next —

How to Properly Clean a Paintbrush
Hardware used in Flying Model Airplanes

Comments about this article


Back to How-To's
Airfield Models Home


Copyright © 2006 Paul K. Johnson