Airfield Models - How To

Apply Fiberglass Cloth to a Model Airplane

December 19, 2021


Home
About
What's New
History
Models Gallery
Model Building Safety
Articles
Mail & FAQ
Site Map
Site Feedback
Contact
Add to Favorites
Comments
Search Airfield Models

Back to How-To Articles


Airfield Models (http://www.airfieldmodels.com/)How to apply fiberglass cloth to a model aircraft

Fiberglass cloth applied with resin is a time-proven base for a long-wearing, durable finish.  It is easier to apply than you might imagine.

Although a painted fiberglass finish is not cheap it will last a long time and can be kept looking new for years with proper care.

Fiberglass can be applied over solid areas only!

I have been asked several times what to do about applying fiberglass over open bays.  The answer is to use a different finish.  If you want a painted finish on open bay construction, then you will have to use a traditional paper or cloth (tissue, silkspan, silk, Sig Coverall, Stits, etc.) applied with dope or use an iron-on fabric such as SolarTex or Coverite.

Safety!  Dust from sanding fiberglass is something you do not want on your skin and especially do not want in your lungs.  Wear a particle mask when sanding and wear clothing that covers you (long sleeves and long pants).  Some type of eye protection is not a bad idea either.

In this series

Also see


Why use fiberglass?

  • Provides a lightweight, consistent and wood grain-free base for paint.

  • Absolutely fuel proof.

  • Durability — will not peel, wrinkle, sag or lift at the seams like iron-on coverings.

  • Easy clean up — No worries about a cleaning cloth lifting a seam when cleaning the model at the field.

  • Easily repaired — Can be repainted, polished, have scuffs removed etc.  A proper repair looks like new - not a patch.

  • Nothing looks like paint except paint.

  • Finish can be any color and is not limited to a few colors like iron-on coverings.

Until you've had a painted airplane, you can not really appreciate how far superior the finish is to any iron-on covering.

I won't kid you though.  A painted finish is a lot of work.  If your planes have a life expectancy of less than 12 months, you may as well stop reading here. Fiberglass doesn't prevent airplanes from crashing.


About fiberglass base finishes

Mike James (NextCraft composite guru) tells me that a fiberglass finish adds tremendous strength to the finish by "unitizing" it. 

A fin and rudder that has been fiberglassed.

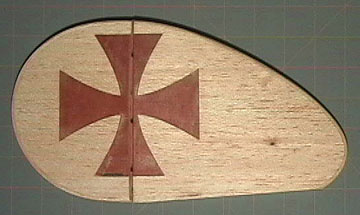
A fiberglassed component

A common misconception regarding a painted fiberglass finish is weight.

A painted finish using fiberglass as a base is not heavy if it is applied correctly.

The only purpose of the resin is to adhere the cloth.  There is no reason to apply heavy coats of resin.  Applying a light coat and sanding between each coat of the finish will keep the finish thin and light.

The reason painted finishes have gotten a bad reputation is because some people slop on the resin and then apply a second coat.  A light sanding is followed with a thick coat or three of primer.  These are lightly sanded, Bondo is added and then thick coats of paint are applied.

A finish such as this is heavy and the paint is likely to chip, peel or crack under flight stress and ground handling.  More likely the plane will become a hangar queen because it is overweight.  The perpetrator of this finish will carry on the fine tradition of claiming paint is heavy.  His paint jobs are heavy, but yours don't have to be.

If you begin with good construction then you shouldn't have to use much filler if at all.

This article will not discuss priming and painting.  It will teach you to apply a good, lightweight fiberglass base.  What I am presenting is the traditional technique for applying glass cloth.

Caution!  Do not apply fiberglass in extremely humid weather.  Water will end up in the resin and it may never cure properly.

Resin can be applied in cold weather, but it will take a long time to fully cure.  It is best if you can put the component someplace relatively warm while it cures.


About fiberglass cloth

Glass cloth comes in a variety of weights.  .5 to 2 ounce cloth is generally used for finishing.  4 to 6 ounce cloth is used for reinforcement such as wrapping around the center section of a wing.

The heavier the weight of the cloth, the more liquid finish it will hold which results in a heavier finish.  Additionally, heavier weights of cloth are less flexible and less able to go around corners and compound curves.

I like .5 to .75 ounce cloth for aircraft models I fiberglass.  Very large scale models may get 2 ounce cloth but honestly I do not feel it is necessary and it simply makes a heavy plane heavier.

Very lightweight cloths are more difficult to work with, however.  The weave comes apart easily so it must be handled carefully.  An Olfa rotary cutter does a great job cutting fiberglass cloth with very little fraying.

Very sharp scissors can also be used to cut the cloth.  Fiskars are excellent scissors and I highly recommend them.

Another way to cut the cloth is to put it between two pieces of newspaper and then cut the whole sandwich with scissors.  This will help prevent fraying but I have found this method to be more trouble than it's worth.  If you are using not-so-sharp scissors then I recommend you use the newspaper method to ensure the cloth cuts cleanly.

It's a good idea to cut the cloth in an area other than where you will be applying it because the little strands of glass that float around can get stuck to your squeegee and make life difficultespecially when trying to get the cloth to stick down around the edges.  The glass strands can stick to both the squeegee and the cloth and pull the cloth away with the squeegee.

Be sure you don't have bits of hardened glue stuck to your fingers when handling fiberglass or it's almost 100% that the weave will get stuck to them and get pulled apart.

In this series

Also see


Previous —
Next —

How To Repair a Flying Model Aircraft
How to Silk a Model Aircraft Wing

Comments about this article


Back to How-To's
Airfield Models Home


Copyright © 2003 Paul K. Johnson