![]()
|
|
|
|
|
|
|
|
|
|
|
|
|
|
|
|
|
About Rustik
For example, the Sig Rascal is a really cute plane with a nice finish. Unfortunately everyone is not only copying the styling (badly I might add), but the finish as well. That is too bad because it will be overdone to the point where I will never want to see it again. All park flyers are transparent pink or green covering over laser burned wood. Sport planes having boring opaque Monokote colors with the occasional plane making a statement in checkerboards or glitter. All aerobatic planes are blue with yellow trim or white with pink and baby blue all over them. I hardly ever see a painted model any more. I admit to being very guilty of the same boring finishes. But I always feel like I didn't give the plane the effort it deserves when I do that. I finally decided to build a plane that I like everything about. This model takes that idea to the extreme. Now that I've gotten a little of it out of my system, I can go back to my Fluorescent Monokote for the next eleven projects. I already knew that I wanted to do an all-natural finish plane. The problem was finding a way to add trim colors. Figuring that part out was more of a challenge than I expected. I ruled out stain immediately because balsa is like a sponge and there would be no controlling where the stain ended up. In other words, I would not be able to mask the wood and stain to a sharp edge. I considered shaping a piece of balsa into a sunburst or stripe and staining it. The next step would be to edge join it with the rest of the sheeting (not an inlay). I ruled this out because I don't like sunbursts very much. The next thing I thought about was simply painting on trim colors over the finish. I did not like this idea either. Eventually it occurred to me that I could inlay trim into the sheeting thinking that as long as the inlays were in low stress areas they would probably be ok. Even though I was attempting to make an artistic statement, I still wanted to keep the plane as light as possible so I stuck to 1/16" sheeting even though 3/32" would have been easier to work with. I think the work was worth it.
|
|
|
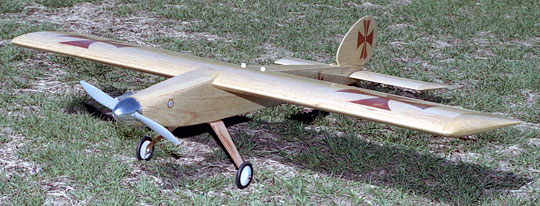
ConstructionRustik is another of my "on the bench" designs. It is a fairly standard planform model having a 4:1 aspect ratio wing with a 15% symmetrical airfoil. Typically when I am scratch building , I build the wing first and then build a fuselage and tail to match. Such was the case with Rustik. The entire model is built from wood including the empennage control horns and landing gear. In fact, I even made the tail wheel mount from hardwood. In retrospect, I should have made the aileron and flap horns from wood as well, but I did not realize I was going to use wood horns at all until after the wing was built. Mike still hassles me about not using wood horns on the wing, but there is not much I can do at this point. I did not design any type of reinforcement into the structure to glue wood horns to — I would have to build all new flaps. Rustik's flying qualities came second to aesthetics. Therefore the airframe is not as light as it could be, but it is as light as it can be for what it is. This same design (aerodynamically) could easily come in around 4 lbs instead of 4-3/4 lbs by building trussed fuselage sides instead of using slabs, eliminating the inlays, building the wing as a D-tube, using strip ailerons with 2 servos instead of 4 and using a carbon fiber landing gear. I did everything I could to ensure this model would not be a lead-sled. Contest balsa is used wherever possible, the ribs have large areas removed from them and pull-pull controls are used rather than pushrods. The pull-pulls are .020 music wire. I made the fittings from threaded rod and used a wire bit to drill small holes to put the wires through.
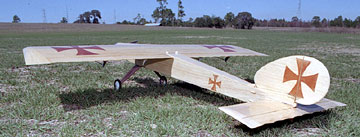
The stabilizer is built using about 20 1/16" contest balsa ribs with 1/8" spars and shear webbing. It is sheeted with 1/32" balsa and has solid wood tips. Prior to finishing, the completed stabilizer weighed 2.1 ounces with elevator, Hinge Points (5 total) and the control horn. The vertical stabilizer is also built up, but because of the inlays, it requires 1/16" sheeting. After the internal structure was built, the fin and rudder were joined together using wood dowels in place of the Hinge Points. Three laminations of 1/32" balsa are wrapped around the perimeter so that the sheeting has something to glue to. The fin and rudder are sheeted as a unit to ensure the inlays would remain in alignment. I could not find a reliable way to jig the fin structure on the board while the sheeting was drying because of the way it is built. Instead I sheeted both sides simultaneously while taking care not to build in a warp. After the sheeting dried and the edge was sanded, the fin and rudder were separated. Each piece has three more laminations of 1/32" balsa to create the edge. At this point all the major structures were done, but the finish was difficult due to the weather. Believe it or not, it even gets too cold in Florida to spray paint. I ended up waiting for the best weather I thought I would get and sprayed when it was 55°. The finish orange-peeled. A lot of sanding got it back to something I could work with and then it orange-peeled again. I realized that I would have to wait for better weather, so I gave it one last light coat to ensure I hadn't missed anything. I knew I could live with it (for now) because the finish is fuel proof. I can sand the paint at any point in the future, do a little masking over switches and such, and then respray.
|
|
|
Maiden Voyage
Mike is a better pilot than I could ever hope to be and I wanted this plane to be right the first time — so I heeded his advice. Mike also performed the test flight. Prior to arriving at the field, I spent a great deal of time going over every detail of this plane to make sure nothing was over-looked. Every piece of hardware was checked and double-checked. Eventually I reached a point where I could think of nothing more to do except wait for a good day to fly. The only thing that I knew I would want to change was the Center of Gravity. It naturally fell at 27% MAC — farther forward than I like. I generally put the CG at about 33% for test flights and adjust from there. Nevertheless, we decided to leave the CG where it was for the first flight. While taxiing, it was easy to see Rustik was light on the tail as it kept looking like it wanted to nose over. Heavy rains last summer and two days of non-stop rain the week prior to the flight left a good portion of our field under water. In fact, on the day Rustik was test flown, several guys were flying float planes from our field. So with the gusty winds, and the water-logged runway, we decided to go for it. Mike taxied Rustik around for a minute and then took her off. The engine seemed fine on the ground, but once in the air it ran very rich which severely limited available power. Like any model, Rustik will go through a period of trimming to get her flying as well as she can. The first change was to move the CG rearward by putting the battery behind the wing. The engine needed some tweaking to get it set properly. It was a brand new engine having only two runs on my test stand prior to the maiden flight. Now that it is broken in a little more, the engine has plenty of power to pull the model vertically. Because the model came in a full pound lighter than expected, her vertical is much better than what I was expecting. By the way, the little "eyeball" on the left side of the fuselage is a carburetor extension. Mike has lots of experience with the O.S. .52. He told me the engine likes to spit fuel from the carburetor, so the extension was added to prevent fuel from collecting inside the cowl. The extension is a piece of plastic tube I purchased from Lowes and is a press fit over the carb. One of my primary worries was with the landing gear. It has been holding up fine. If you watch any of the videos you'll see what our flying field looks like. It's not exactly what you would call smooth. Nevertheless, the gear has performed flawlessly. I honestly couldn't be happier with this model.
|
|
|
|
|
|
|
|
|
Copyright © 2004 Paul K. Johnson
|
|


 The
current crop of radio control model airplanes is boring me to tears.
Unless the plane is scale (painted and detailed), exceptionally well built, or
it really stands out in some way,
they all look the same - especially ARF's.
The
current crop of radio control model airplanes is boring me to tears.
Unless the plane is scale (painted and detailed), exceptionally well built, or
it really stands out in some way,
they all look the same - especially ARF's.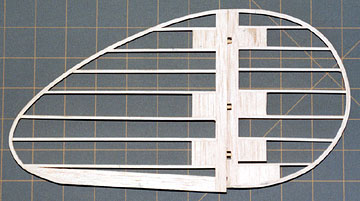 All tail surfaces are
built up and incredibly light and strong. In fact, they are lighter than a
thinner sheet surface would be.
All tail surfaces are
built up and incredibly light and strong. In fact, they are lighter than a
thinner sheet surface would be.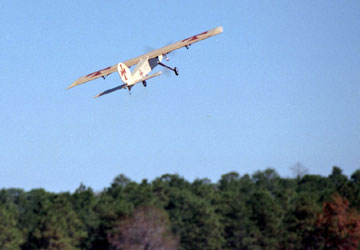 My
very good friend, Mike Phillips, deserves my praise and gratitude for many
reasons. Not only did he keep the pressure on for me to finish Rustik
during various phases when my motivation was waning, but his feedback was
extremely helpful in the design of this model.
My
very good friend, Mike Phillips, deserves my praise and gratitude for many
reasons. Not only did he keep the pressure on for me to finish Rustik
during various phases when my motivation was waning, but his feedback was
extremely helpful in the design of this model.